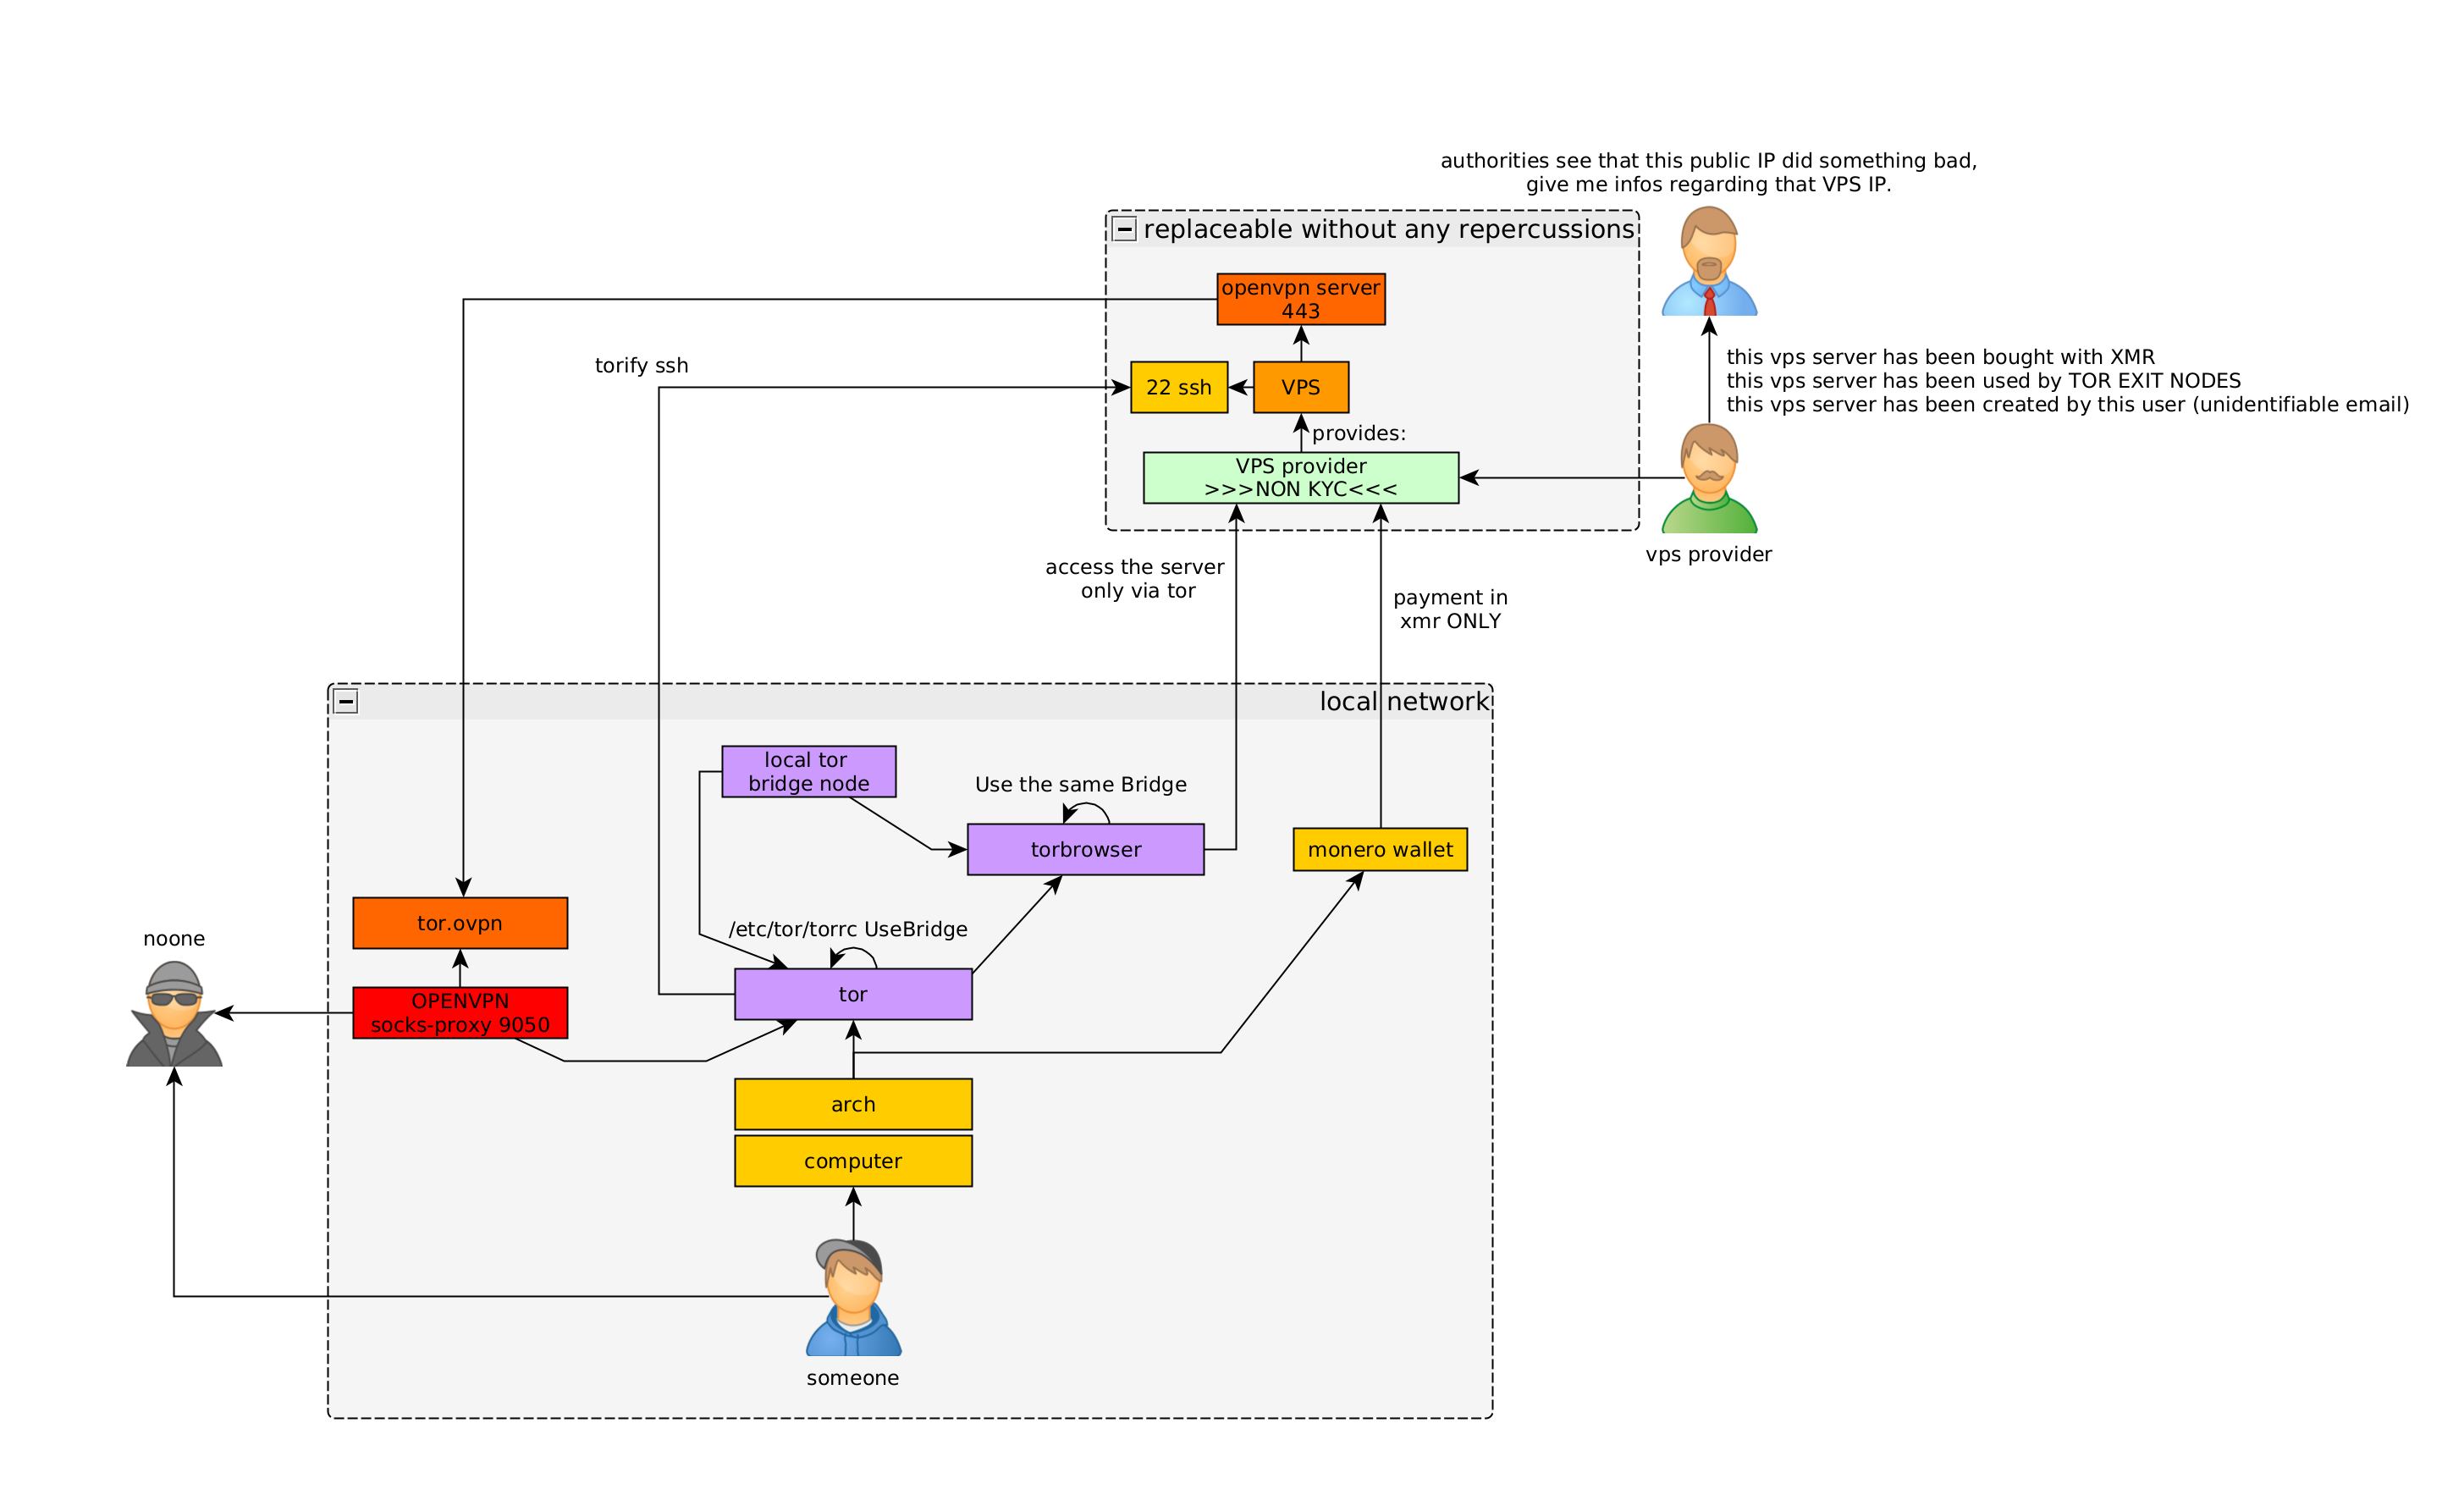
Initial Setup
Let's first setup our local bridge node following this tutorial:
Port forward it accordingly:

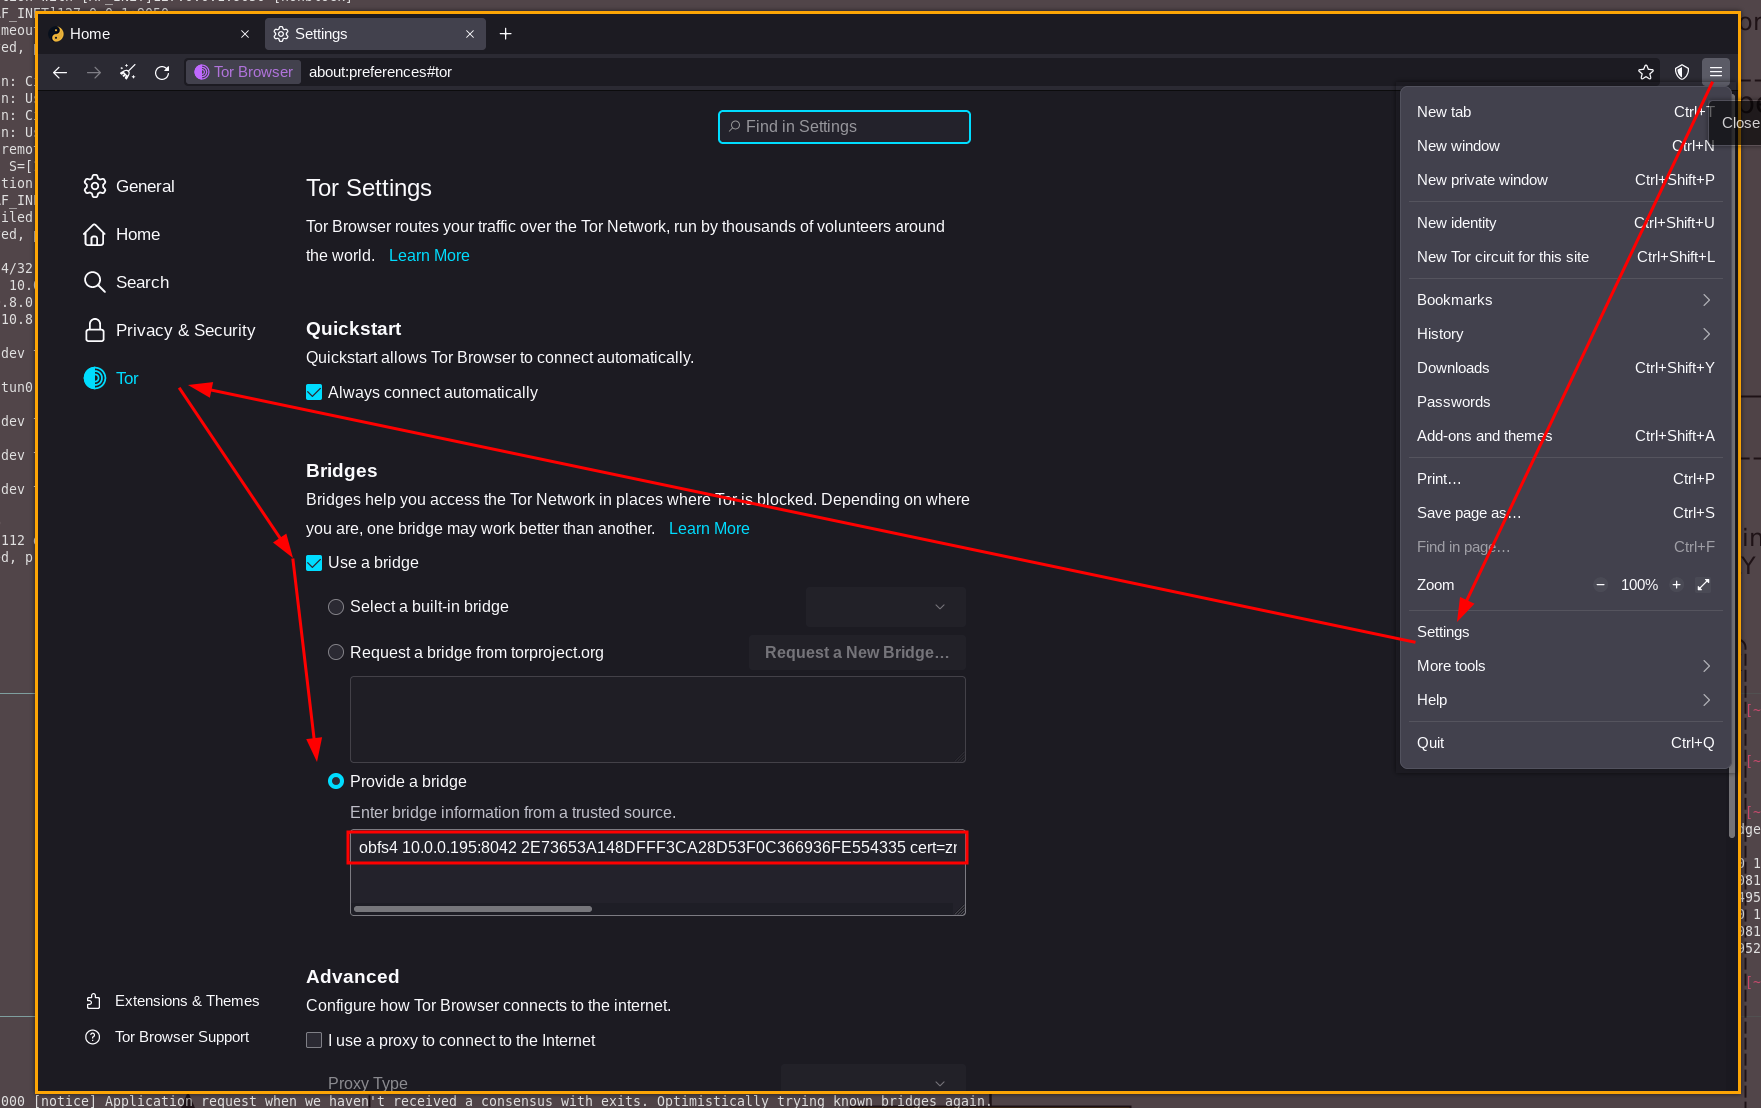
Then we setup our /etc/tor/torrc to use the aforementionned bridge using the local IP:
[ 10.8.0.3/24 ] [ /dev/pts/42 ] [Github/blog/servers]
→ cat /etc/tor/torrc
UseBridges 1
ClientTransportPlugin obfs4 exec /usr/bin/obfs4proxy
Bridge obfs4 10.0.0.195:8042 2E73653A148DFFF3CA28D53F0C366936FE554335 cert=znEl9kidNa4TgqiasENSDvxLPDVMOvdIPcVhqwMR27iVUoMn+MtjoxmcpikFpsYAbtSpMw iat-mode=0
DataDirectory /var/lib/tor
TransPort 9040
SocksPort 9050
DNSPort 53
User tor

[ 10.8.0.3/24 ] [ /dev/pts/42 ] [Github/blog/servers]
→ sudo systemctl restart tor

[ 10.8.0.3/24 ] [ /dev/pts/42 ] [Github/blog/servers]
→ systemctl status tor
● tor.service - Anonymizing overlay network for TCP
     Loaded: loaded (/usr/lib/systemd/system/tor.service; disabled; vendor preset: disabled)
     Active: active (running) since Sun 2022-05-08 10:57:41 CEST; 1min 0s ago
    Process: 1003370 ExecStartPre=/usr/bin/tor -f /etc/tor/torrc --verify-config (code=exited, status=0/SUCCESS)
   Main PID: 1003371 (tor)
      Tasks: 17 (limit: 38362)
     Memory: 34.3M
        CPU: 1.424s
     CGroup: /system.slice/tor.service
             ├─ 1003371 /usr/bin/tor -f /etc/tor/torrc
             └─ 1003372 /usr/bin/obfs4proxy

May 08 10:57:43 nowhere tor[1003371]: May 08 10:57:43.000 [warn] Proxy Client: unable to connect OR connection (handshaking (proxy)) with 10.0.0.195:8042 ID=qEfL9Hs/zItO6W47UpNZLFgifzV8CYepEdmgFAO5Bq8 RSA_ID=2E73653A148DFFF3CA28D53F0C366936FE554335 ("general SOCKS server failure")
May 08 10:57:45 nowhere tor[1003371]: May 08 10:57:45.000 [warn] Proxy Client: unable to connect OR connection (handshaking (proxy)) with 10.0.0.195:8042 ID=qEfL9Hs/zItO6W47UpNZLFgifzV8CYepEdmgFAO5Bq8 RSA_ID=2E73653A148DFFF3CA28D53F0C366936FE554335 ("general SOCKS server failure")
May 08 10:57:46 nowhere tor[1003371]: May 08 10:57:46.000 [notice] Application request when we haven't received a consensus with exits. Optimistically trying known bridges again.
May 08 10:57:46 nowhere tor[1003371]: May 08 10:57:46.000 [notice] Bootstrapped 10% (conn_done): Connected to a relay
May 08 10:57:46 nowhere tor[1003371]: May 08 10:57:46.000 [notice] Bootstrapped 14% (handshake): Handshaking with a relay
May 08 10:57:46 nowhere tor[1003371]: May 08 10:57:46.000 [notice] Bootstrapped 15% (handshake_done): Handshake with a relay done
May 08 10:57:46 nowhere tor[1003371]: May 08 10:57:46.000 [notice] Bootstrapped 75% (enough_dirinfo): Loaded enough directory info to build circuits
May 08 10:57:46 nowhere tor[1003371]: May 08 10:57:46.000 [notice] Bootstrapped 90% (ap_handshake_done): Handshake finished with a relay to build circuits
May 08 10:57:46 nowhere tor[1003371]: May 08 10:57:46.000 [notice] Bootstrapped 95% (circuit_create): Establishing a Tor circuit
May 08 10:57:46 nowhere tor[1003371]: May 08 10:57:46.000 [notice] Bootstrapped 100% (done): Done
Then we setup our tor webbrowser to also use the same bridge:
Once that's done we go and buy ourselves a VPS from a non-KYC VPS provider:
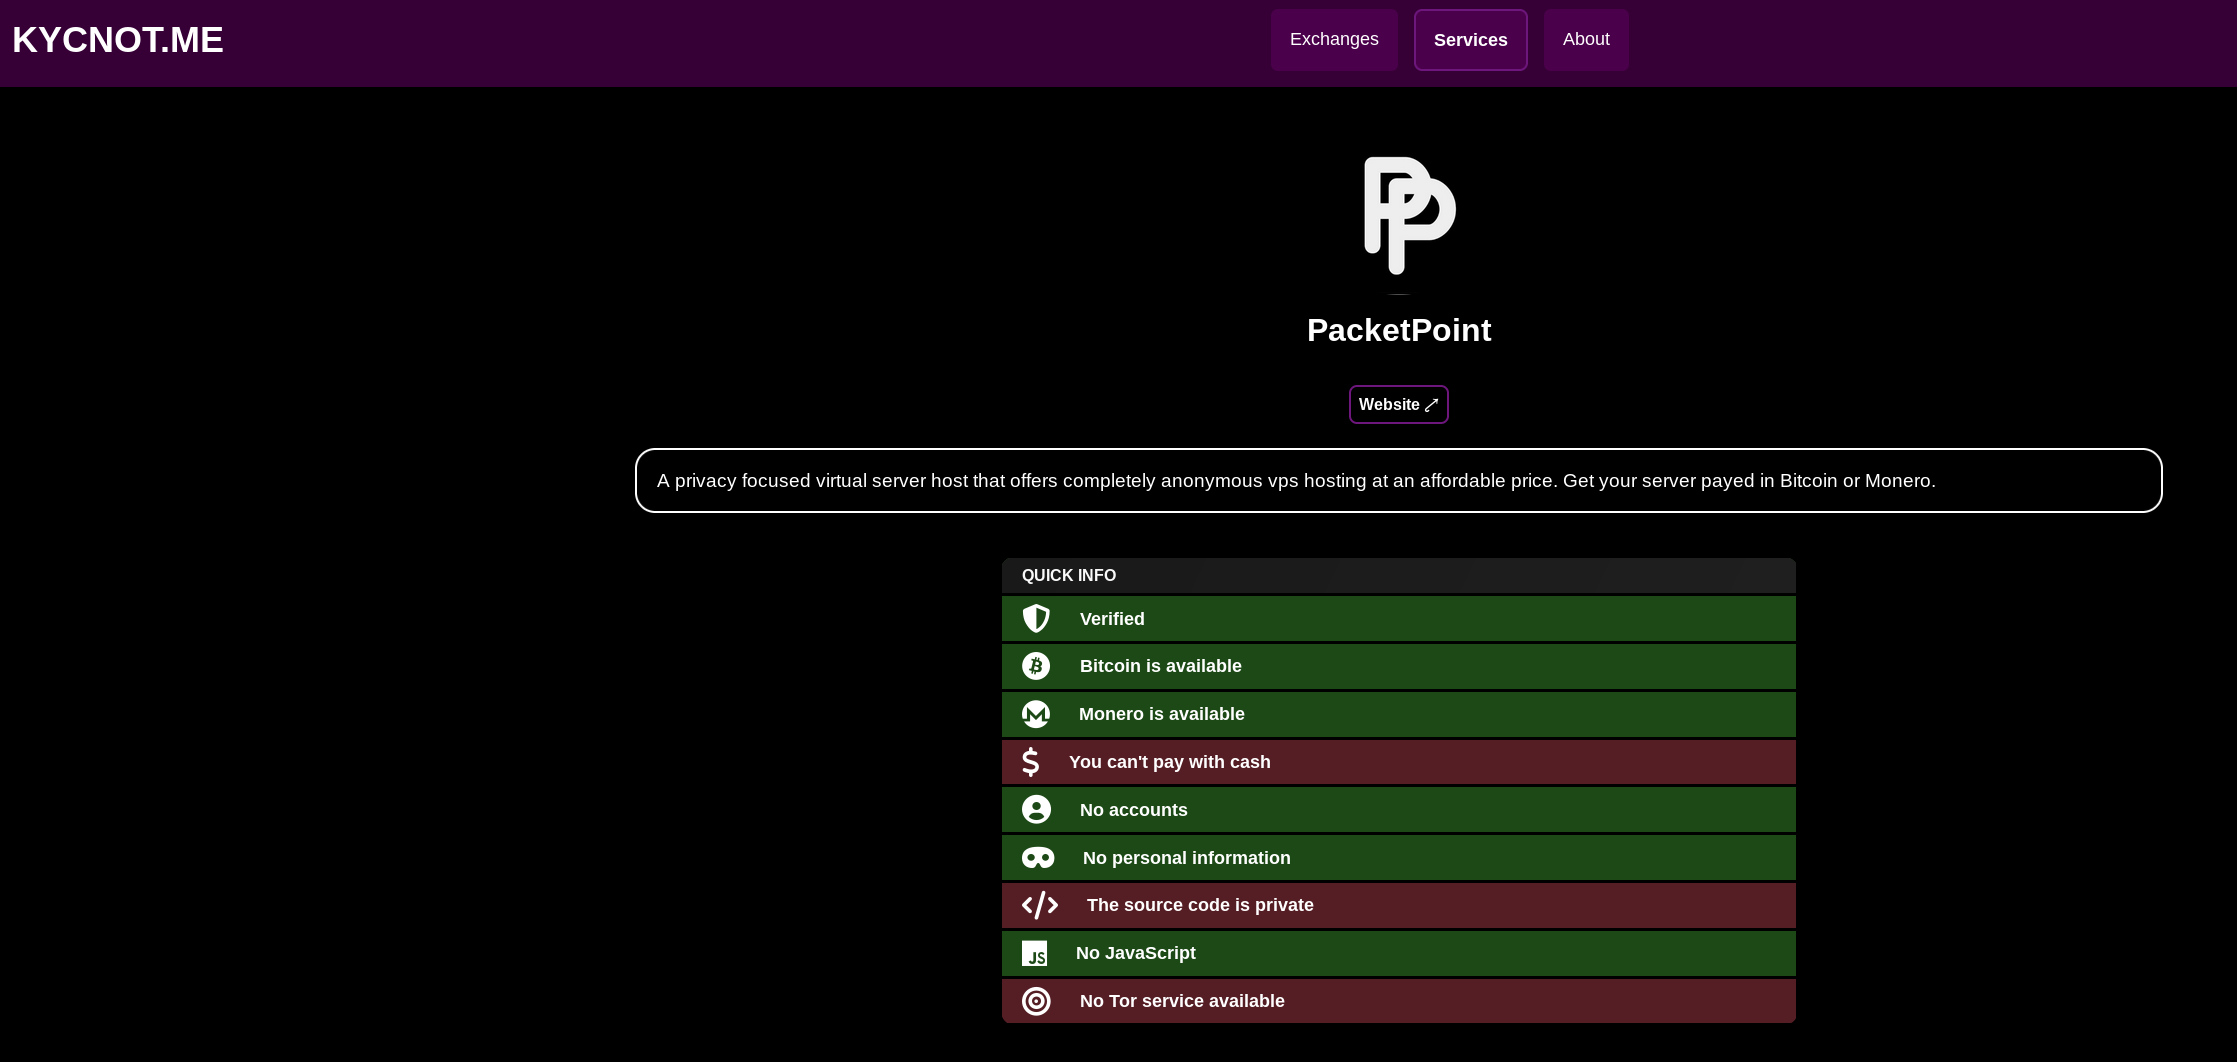
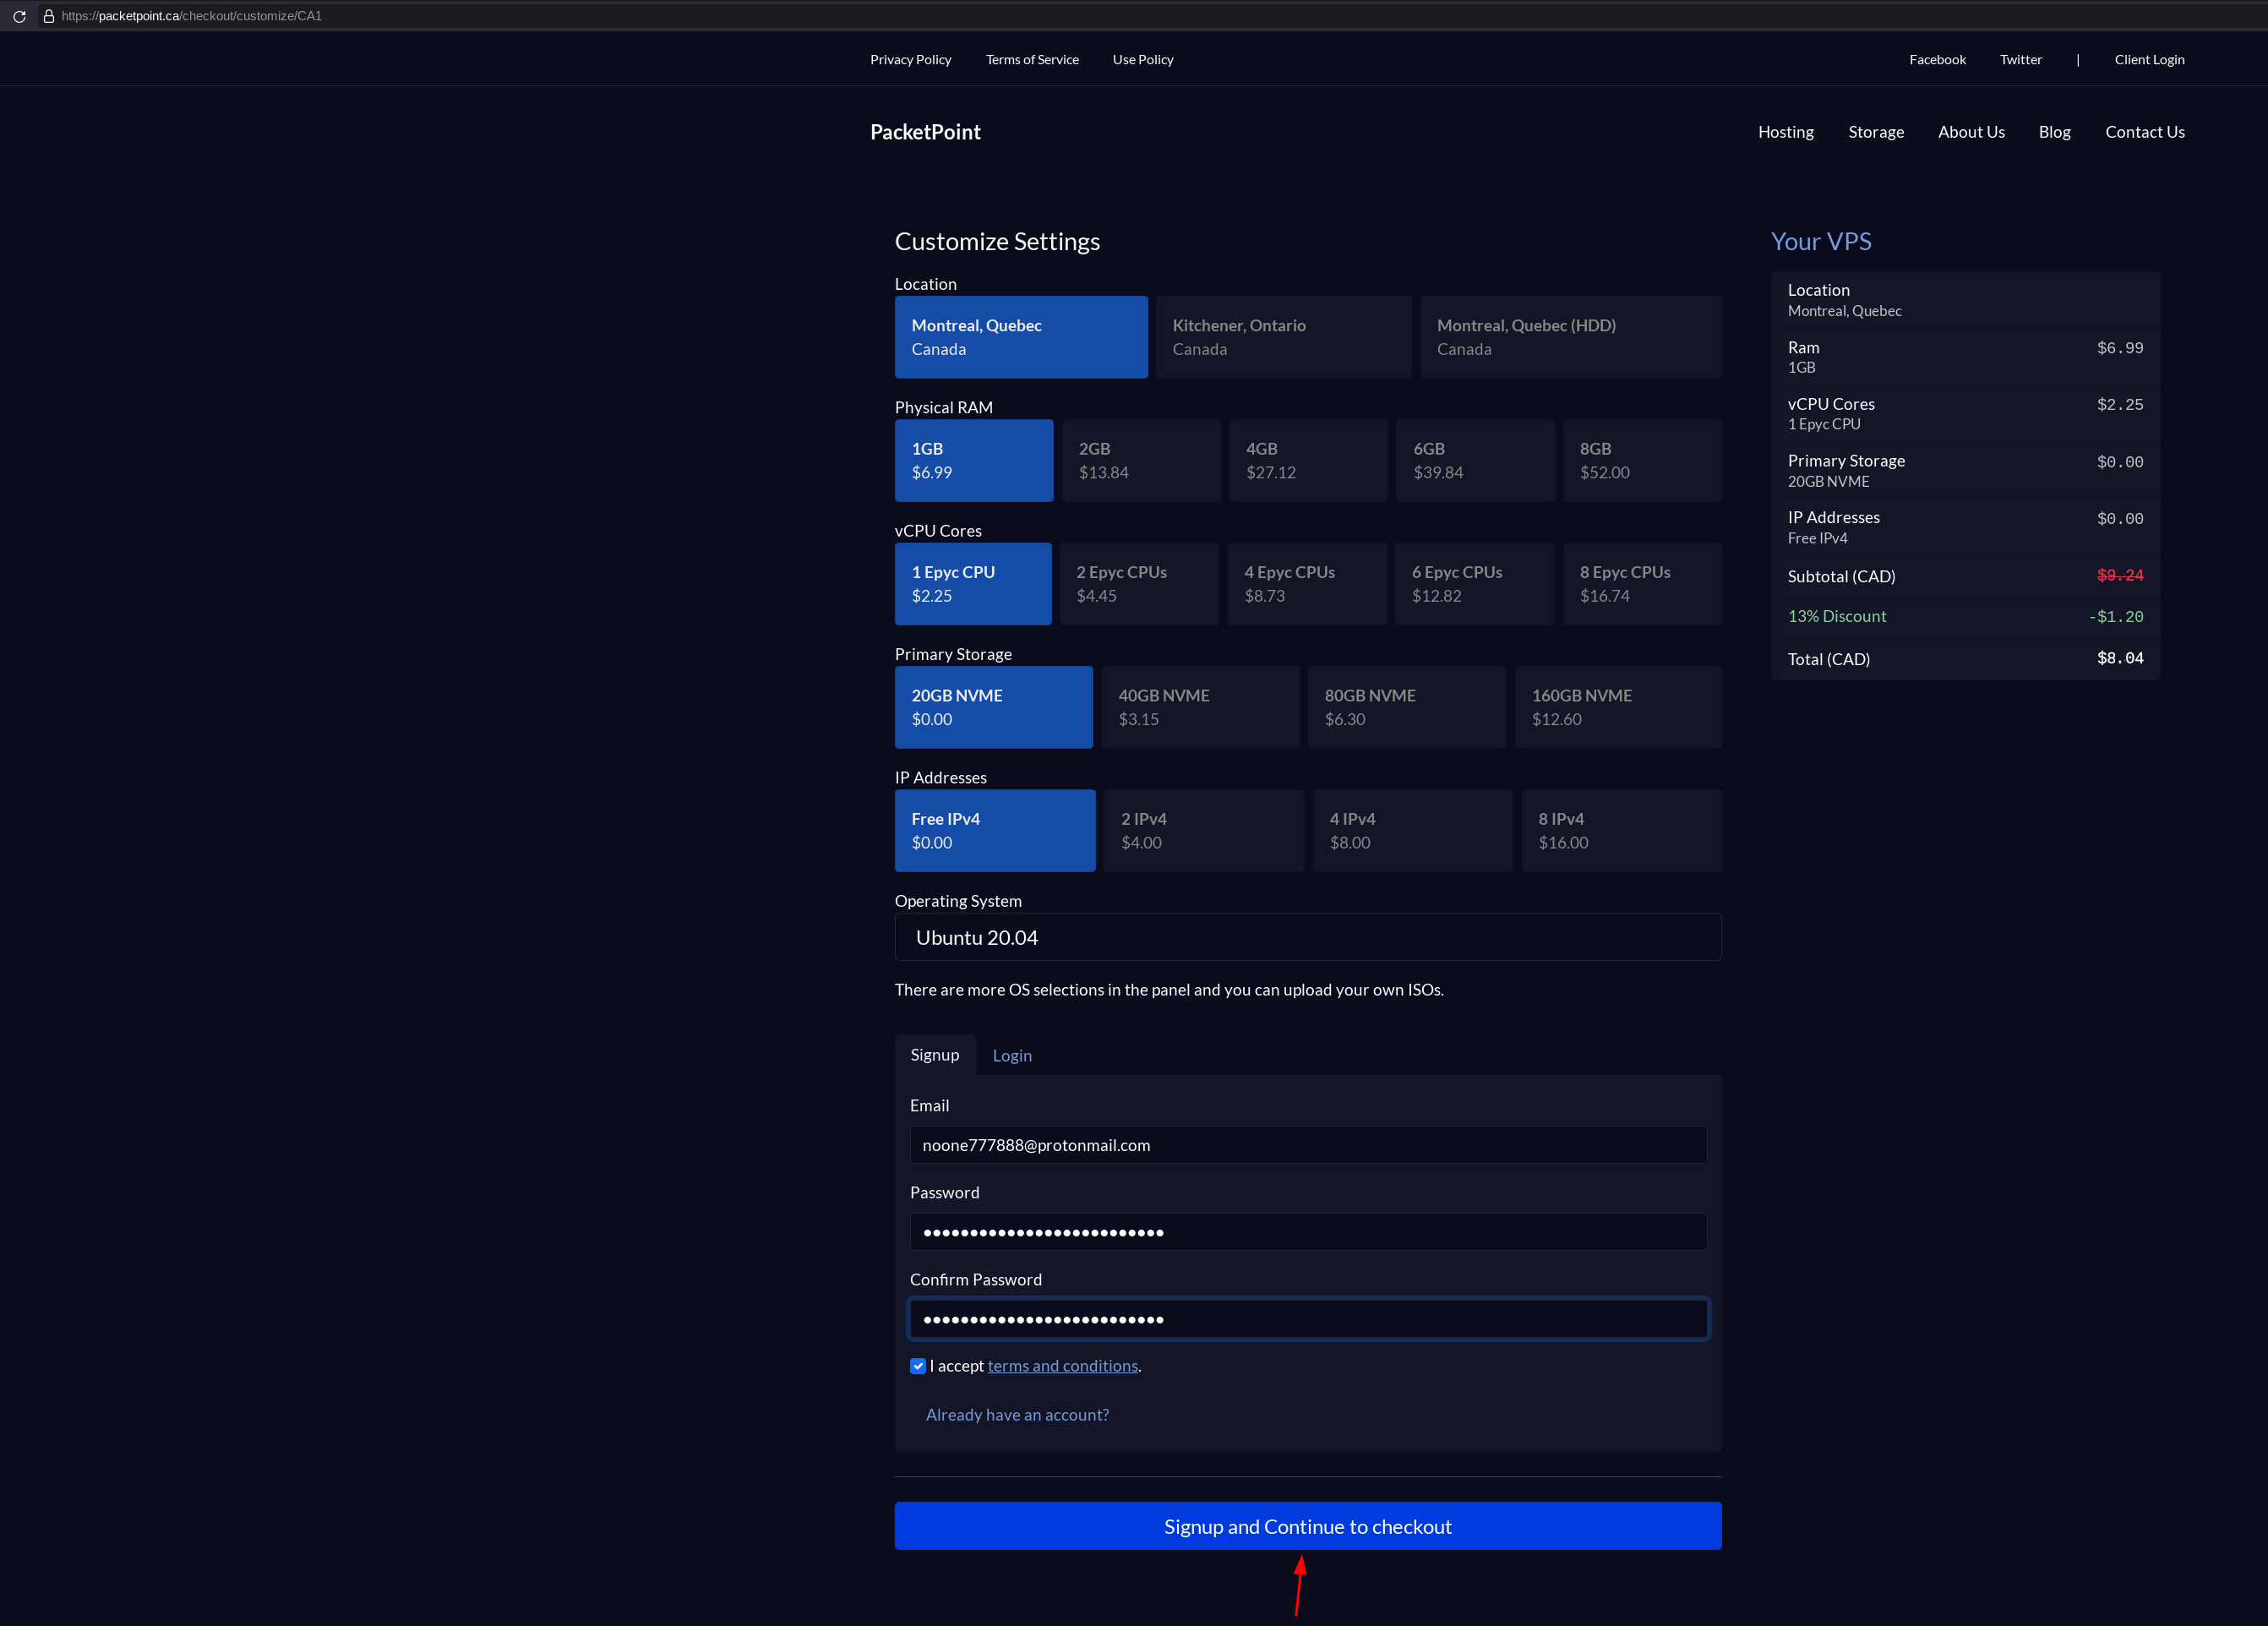
For this example i will go with PacketPoint.ca:
For this we need an email address, i will use protonmail for this purpose for now. And of course you must only use the tor browser to acccess protonmail.
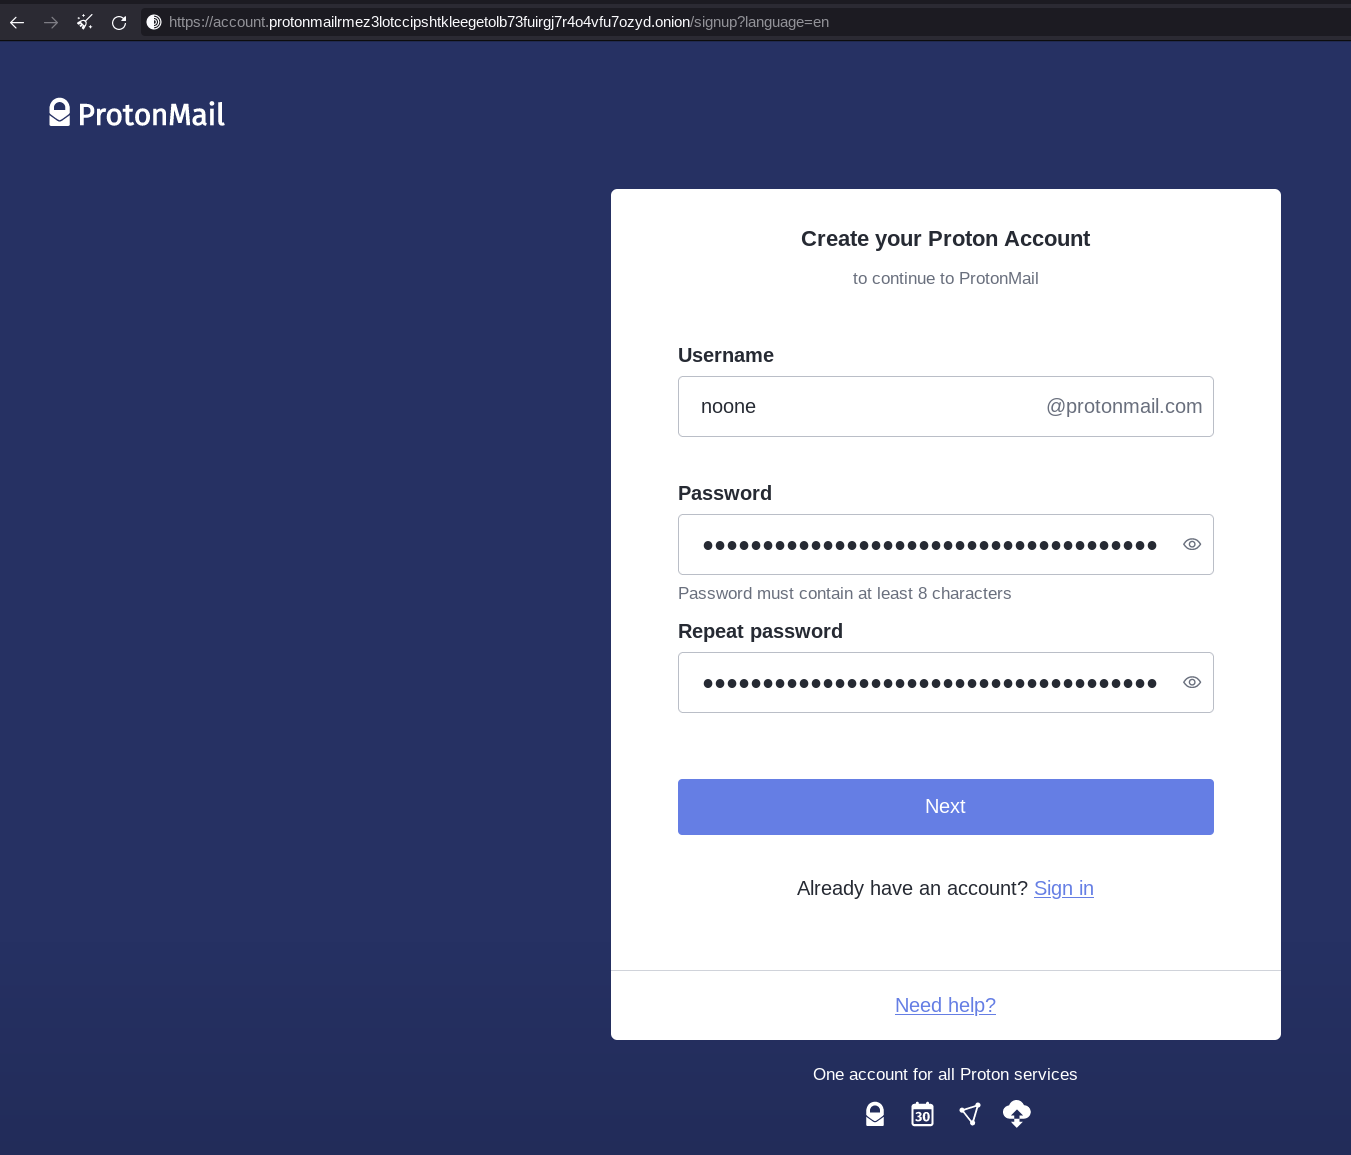
Do not use a recovery mail, unless if you followed the same process for the mail signup meaning you only used tor to access it.

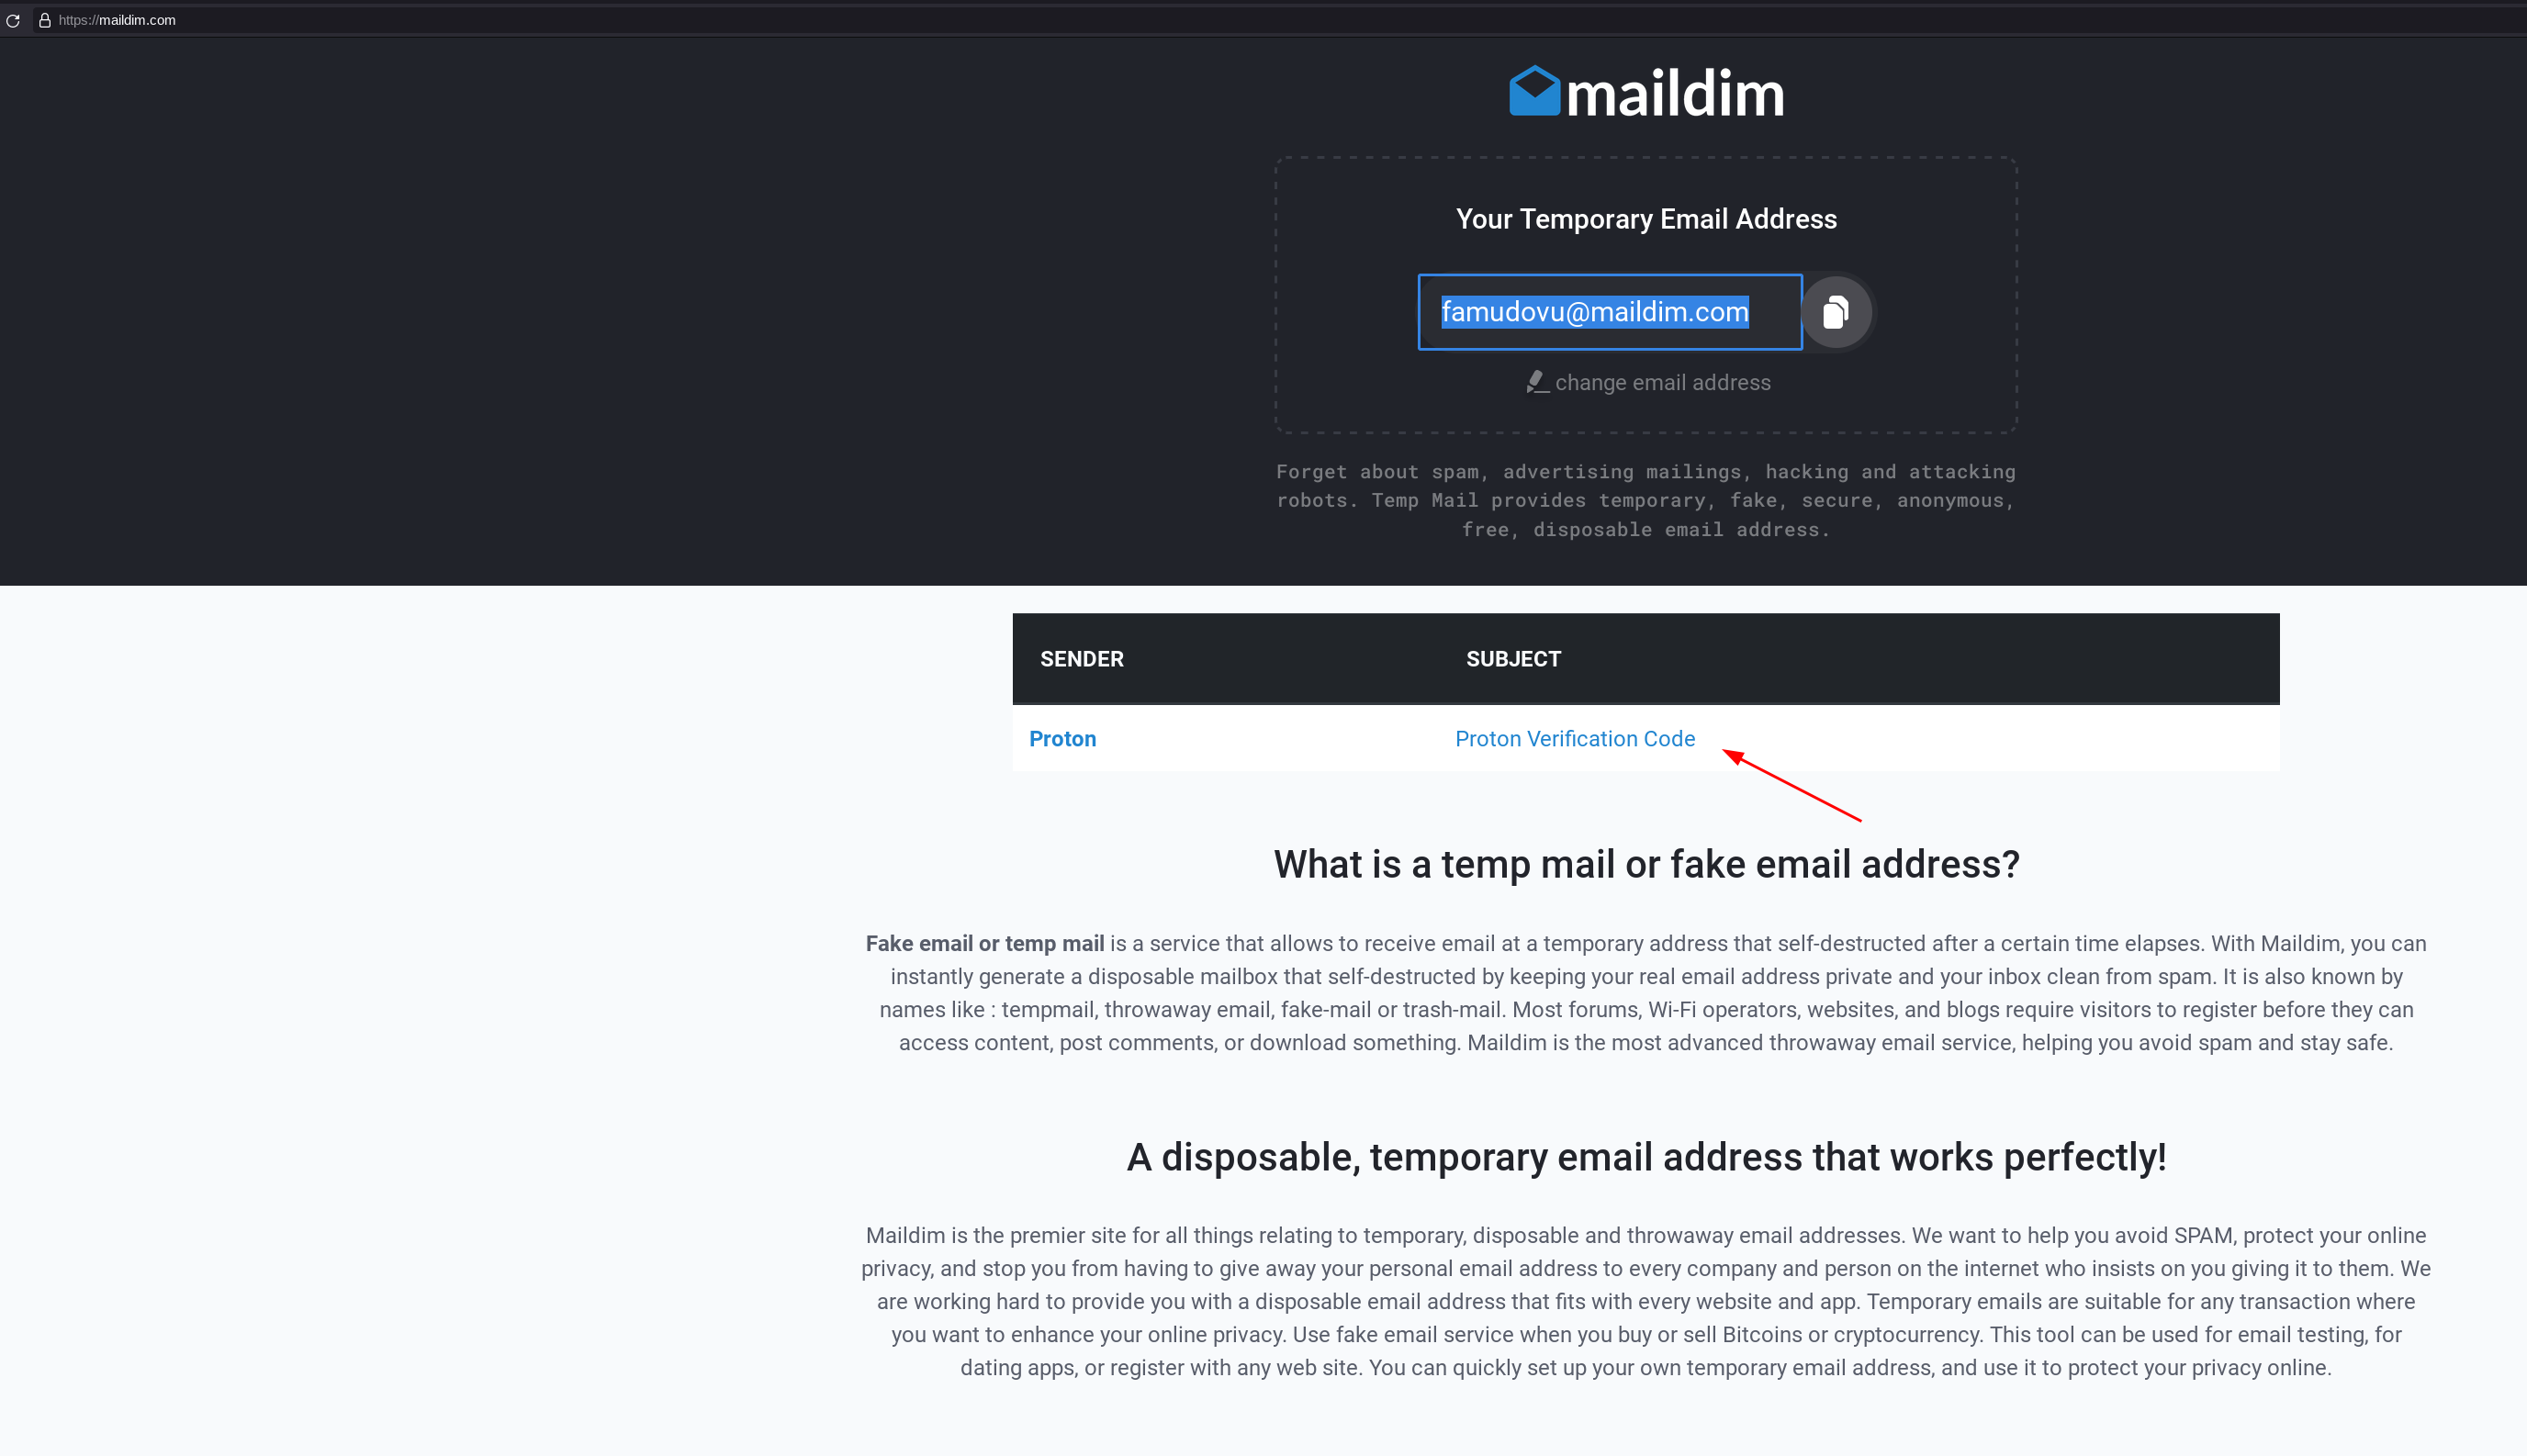
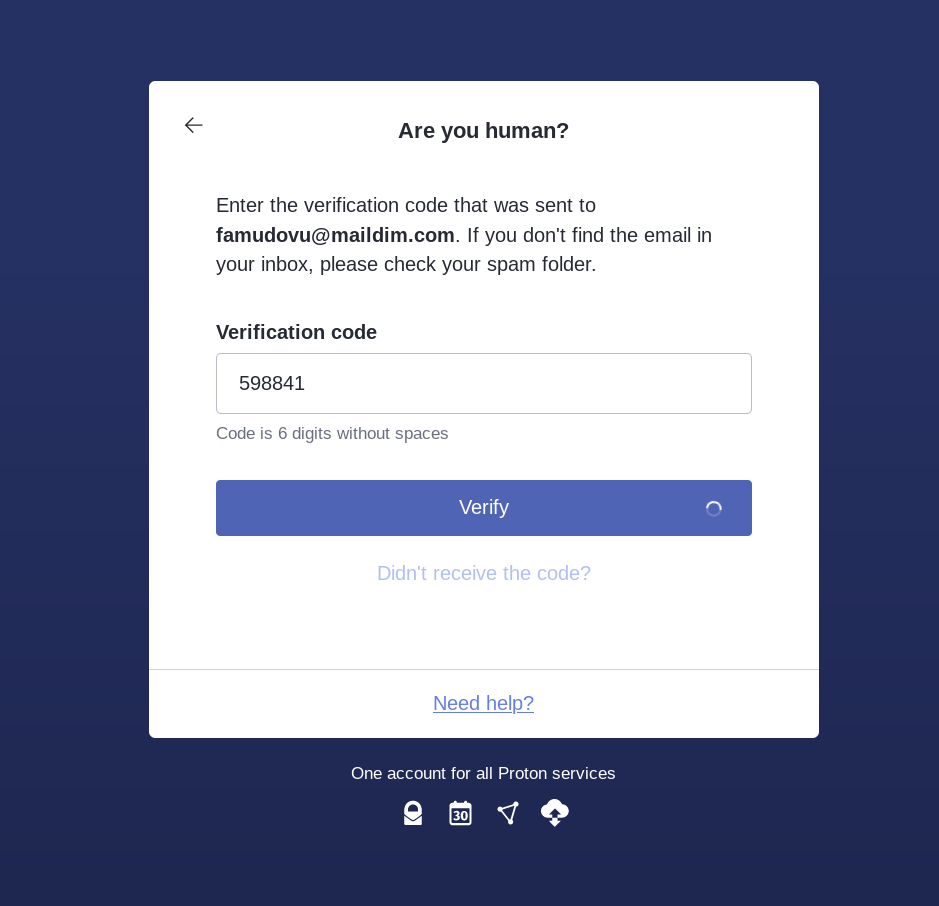
Then select the free plan, and if protonmail asks you to verify if you are human (don't be fooled, it is to make sure they have your public IP or a way to redirect the authorities somewhere in case they see misuse of your protonmail mailbox) make sure you use a disposable mail service to verify your mail:


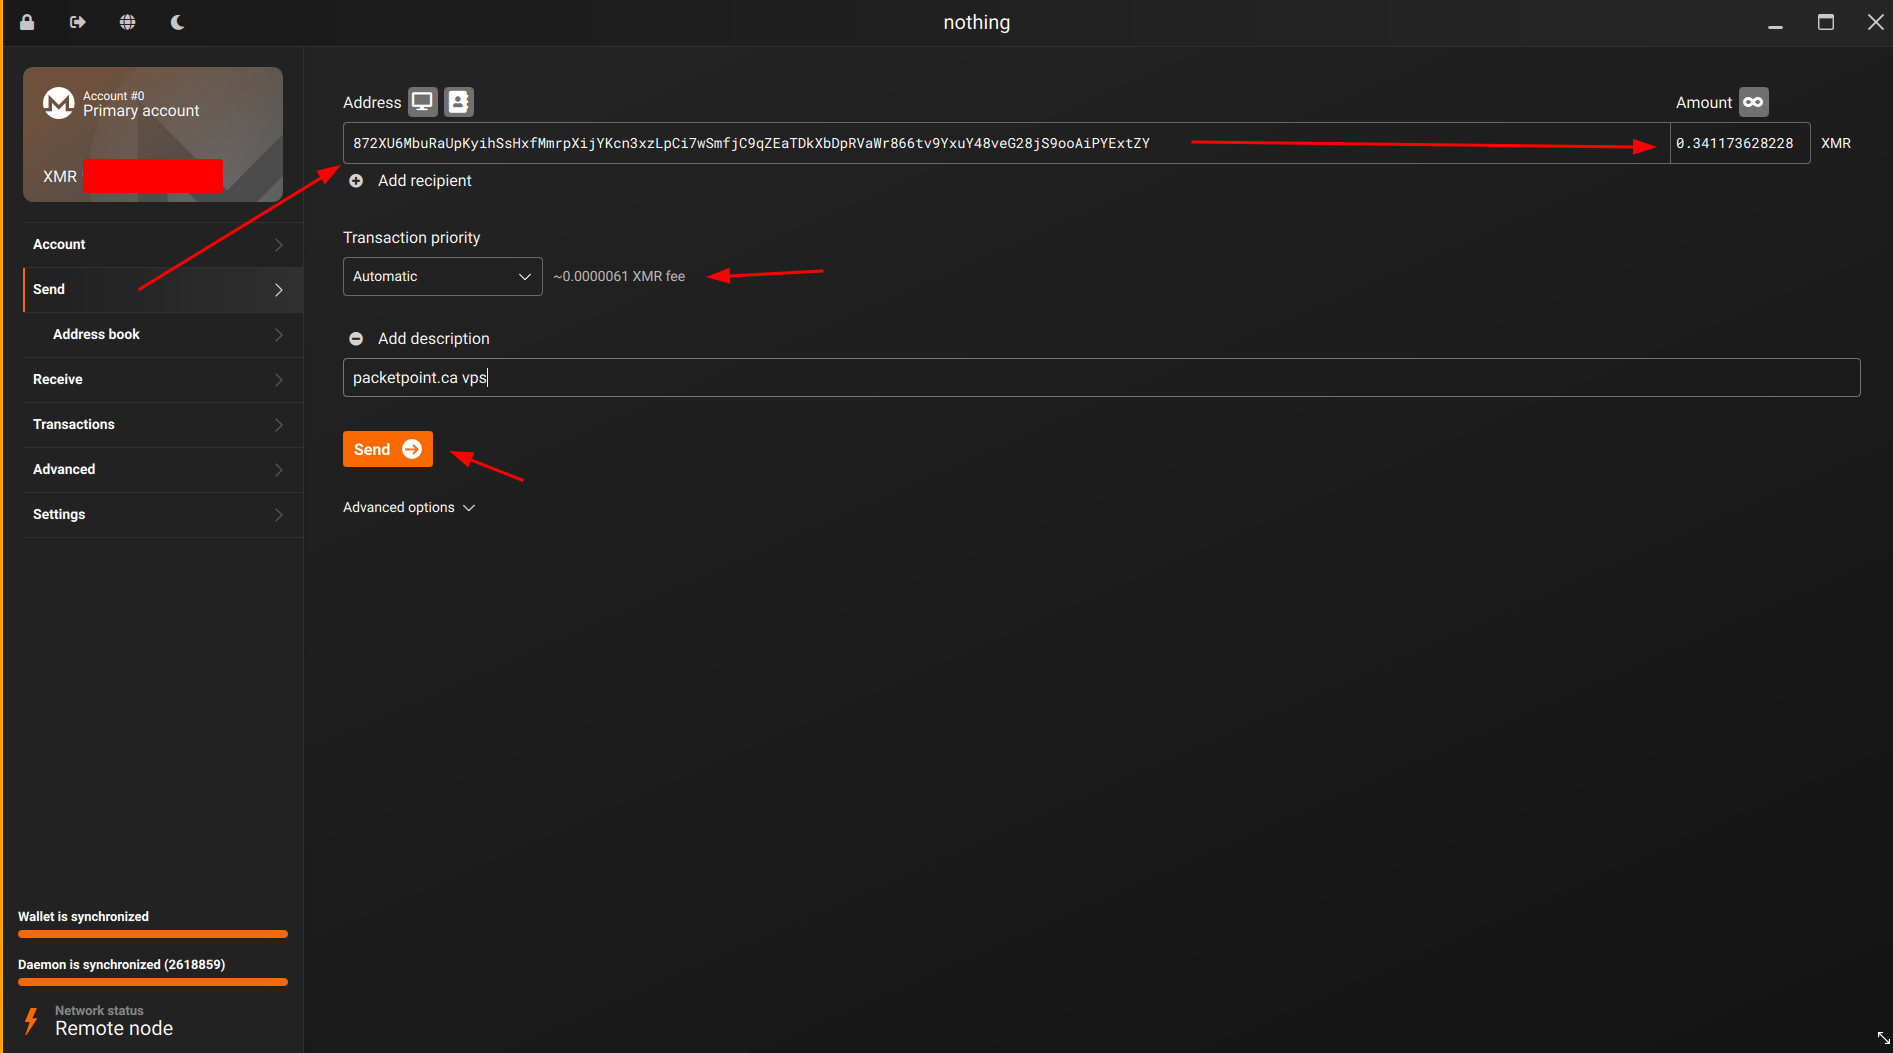
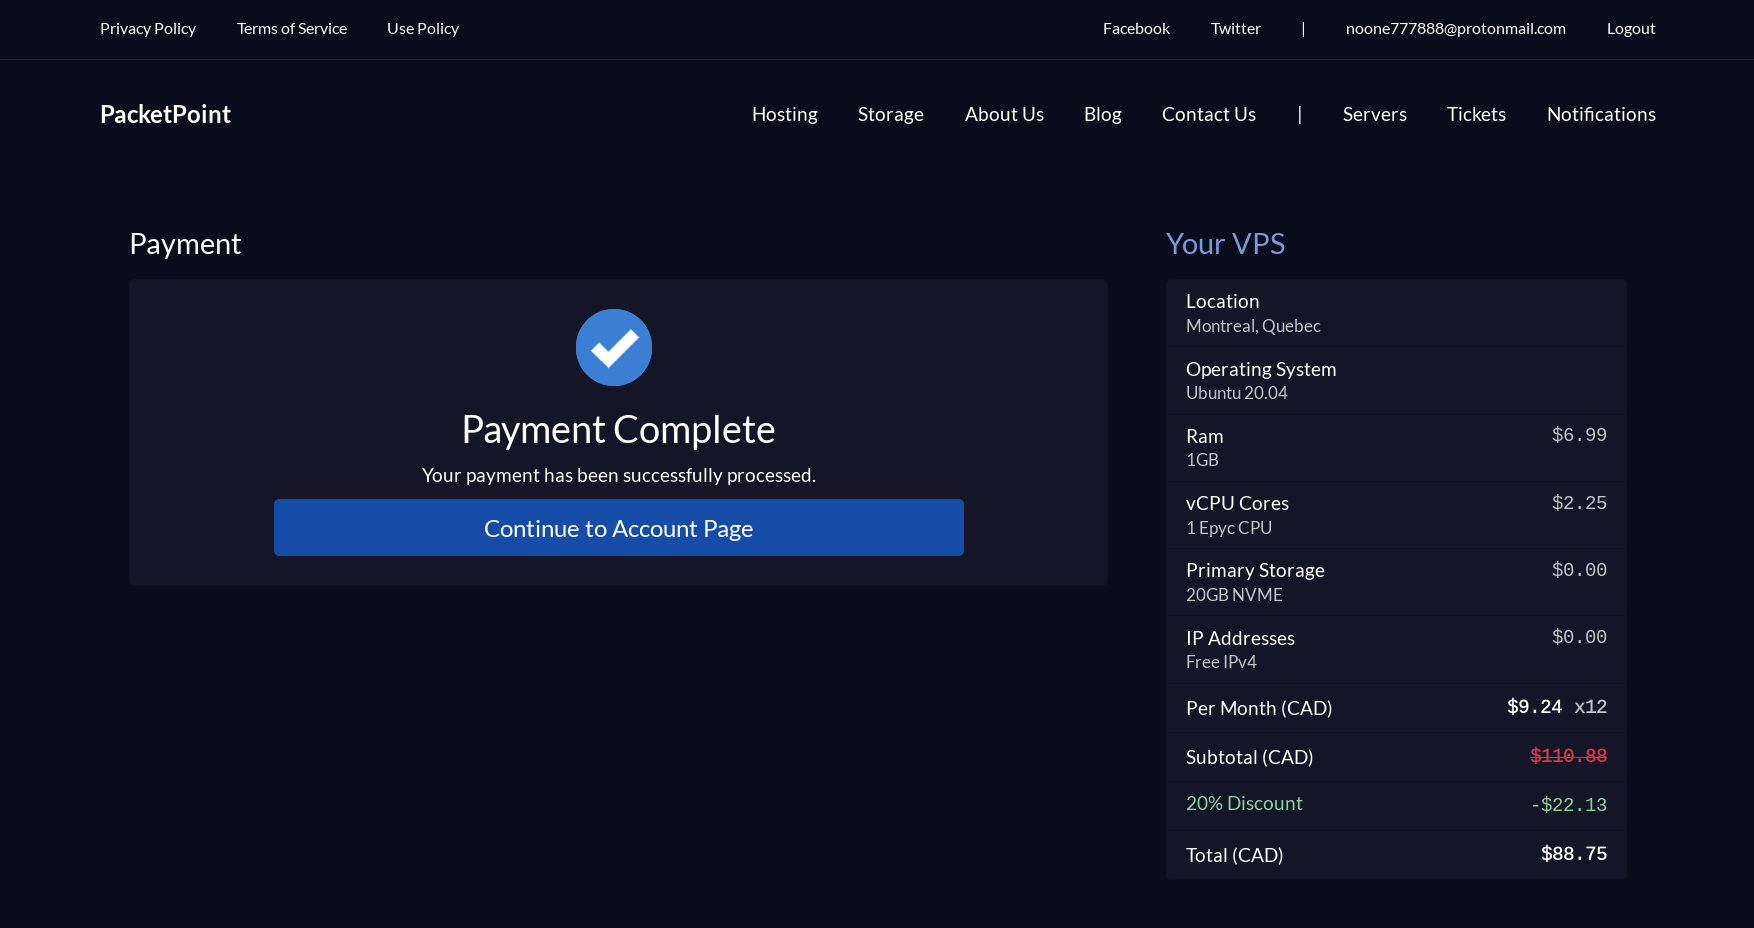
Then we create our VPS account and buy our VPS using monero:
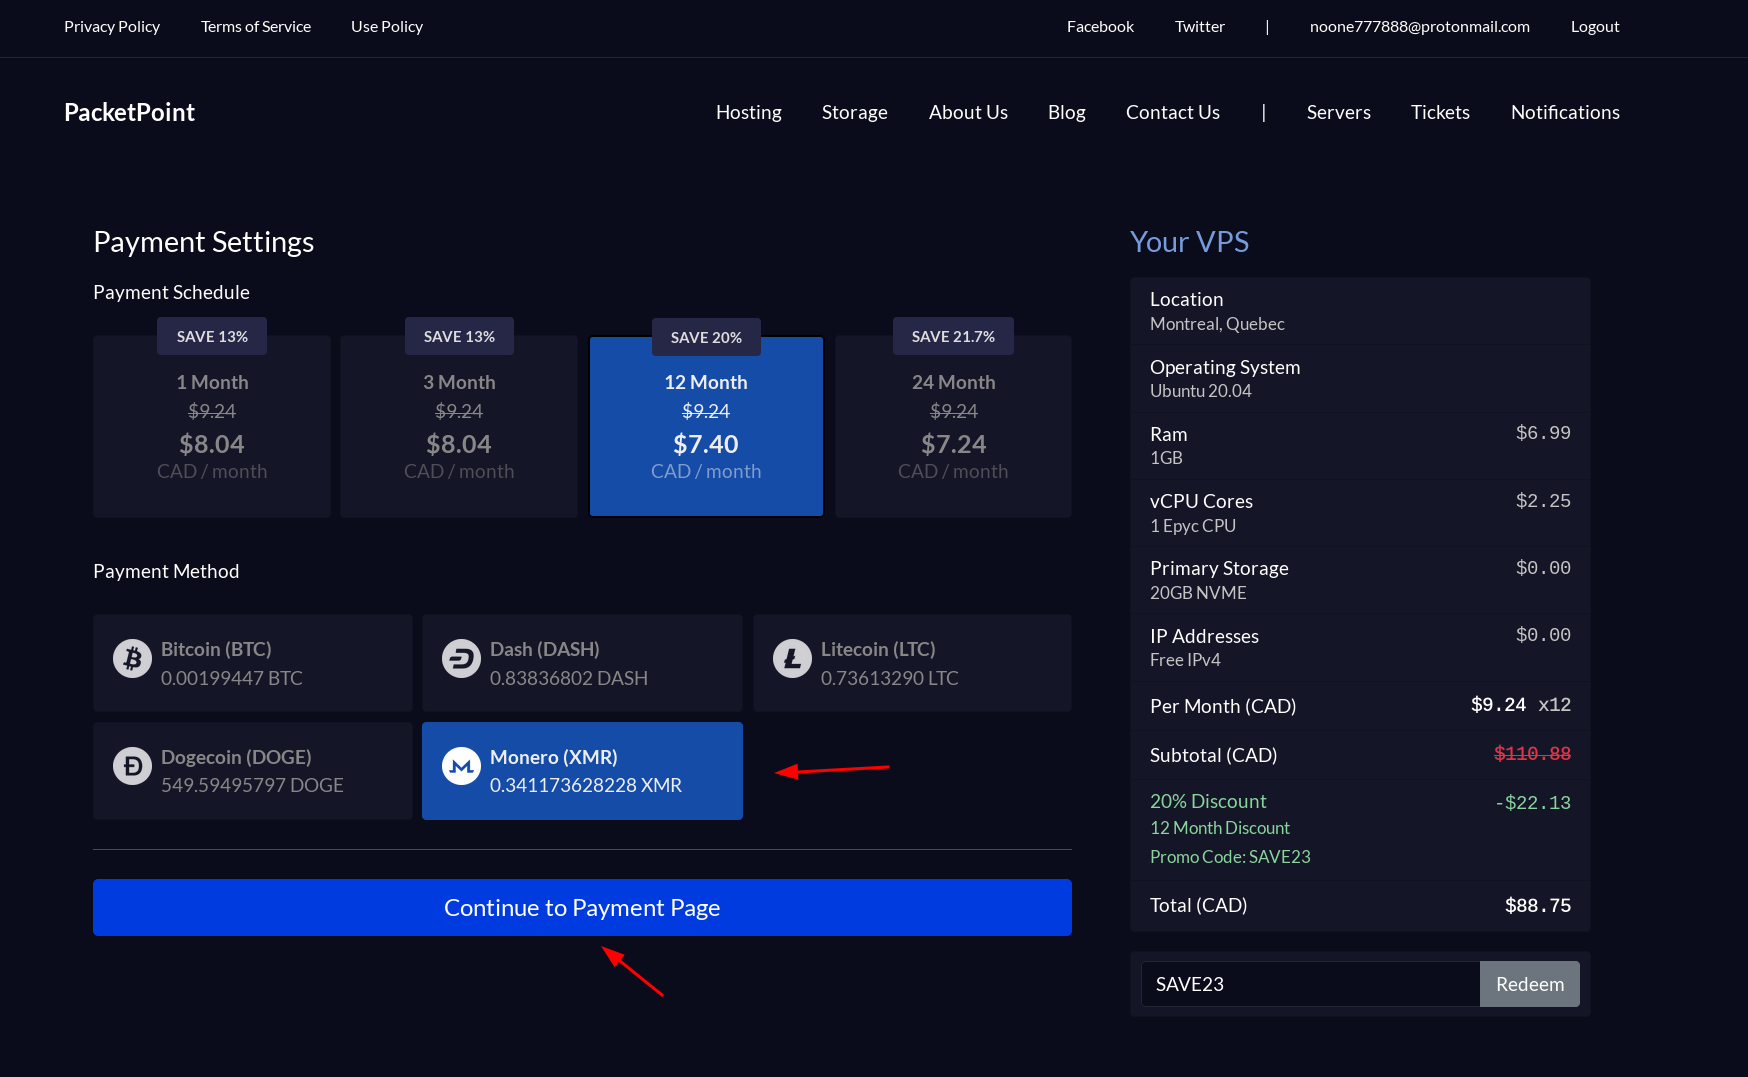
Make sure to send exactly the requested amount otherwise you would need to refund and redo the payment.
Now from here you will need to wait a bit (approximately 30 minutes-1hour) for your monero transaction to be validated by the network:


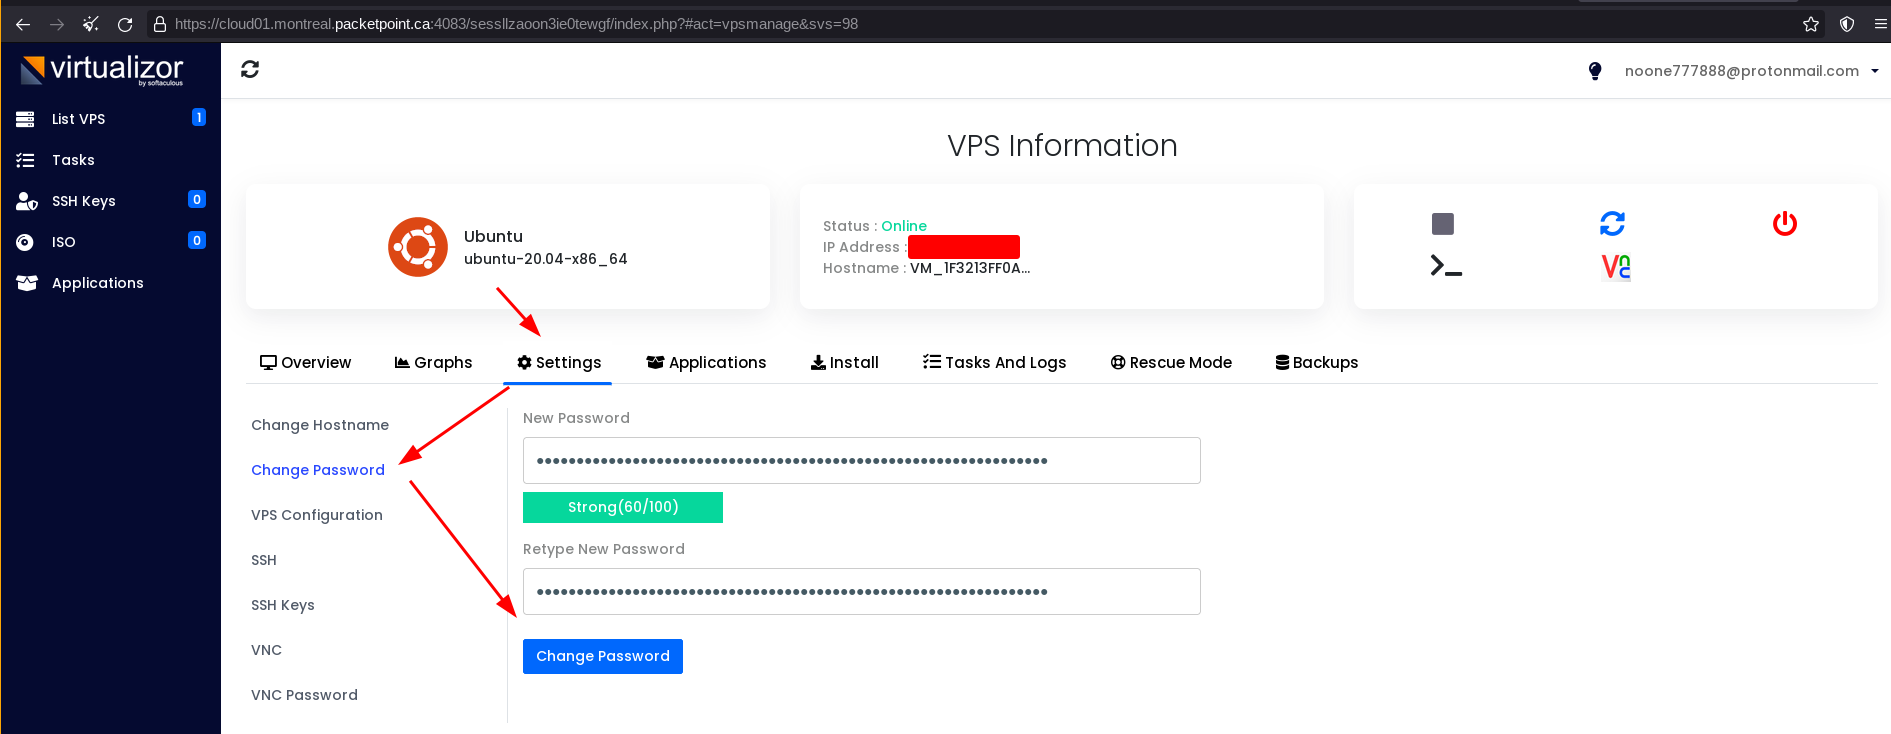
To setup SSH initially we use a private SSH key:
[ 10.8.0.3/24 ] [ /dev/pts/58 ] [~/.ssh]
→ ssh-keygen -t ed25519
Generating public/private ed25519 key pair.
Enter file in which to save the key (/home/nothing/.ssh/id_ed25519): torified
Enter passphrase (empty for no passphrase):
Enter same passphrase again:
Your identification has been saved in torified
Your public key has been saved in torified.pub
The key fingerprint is:
[...]

[ 10.8.0.3/24 ] [ /dev/pts/58 ] [~/.ssh]
→ chmod 600 torified

[ 10.8.0.3/24 ] [ /dev/pts/58 ] [~/.ssh]
→ cat torified.pub
ssh-ed25519 AAAAC3NzaC1lZDI1NTE5AAAAIJCG8bJGybha6i7SmqhJUVsy+MilMgmtyzB/c8t+eYVS nothing@nowhere

[ 10.8.0.3/24 ] [ /dev/pts/58 ] [~/.ssh]
→ cat config
Host torVPS
        Hostname x.x.x.x
        IdentityFile ~/.ssh/torified
        User root
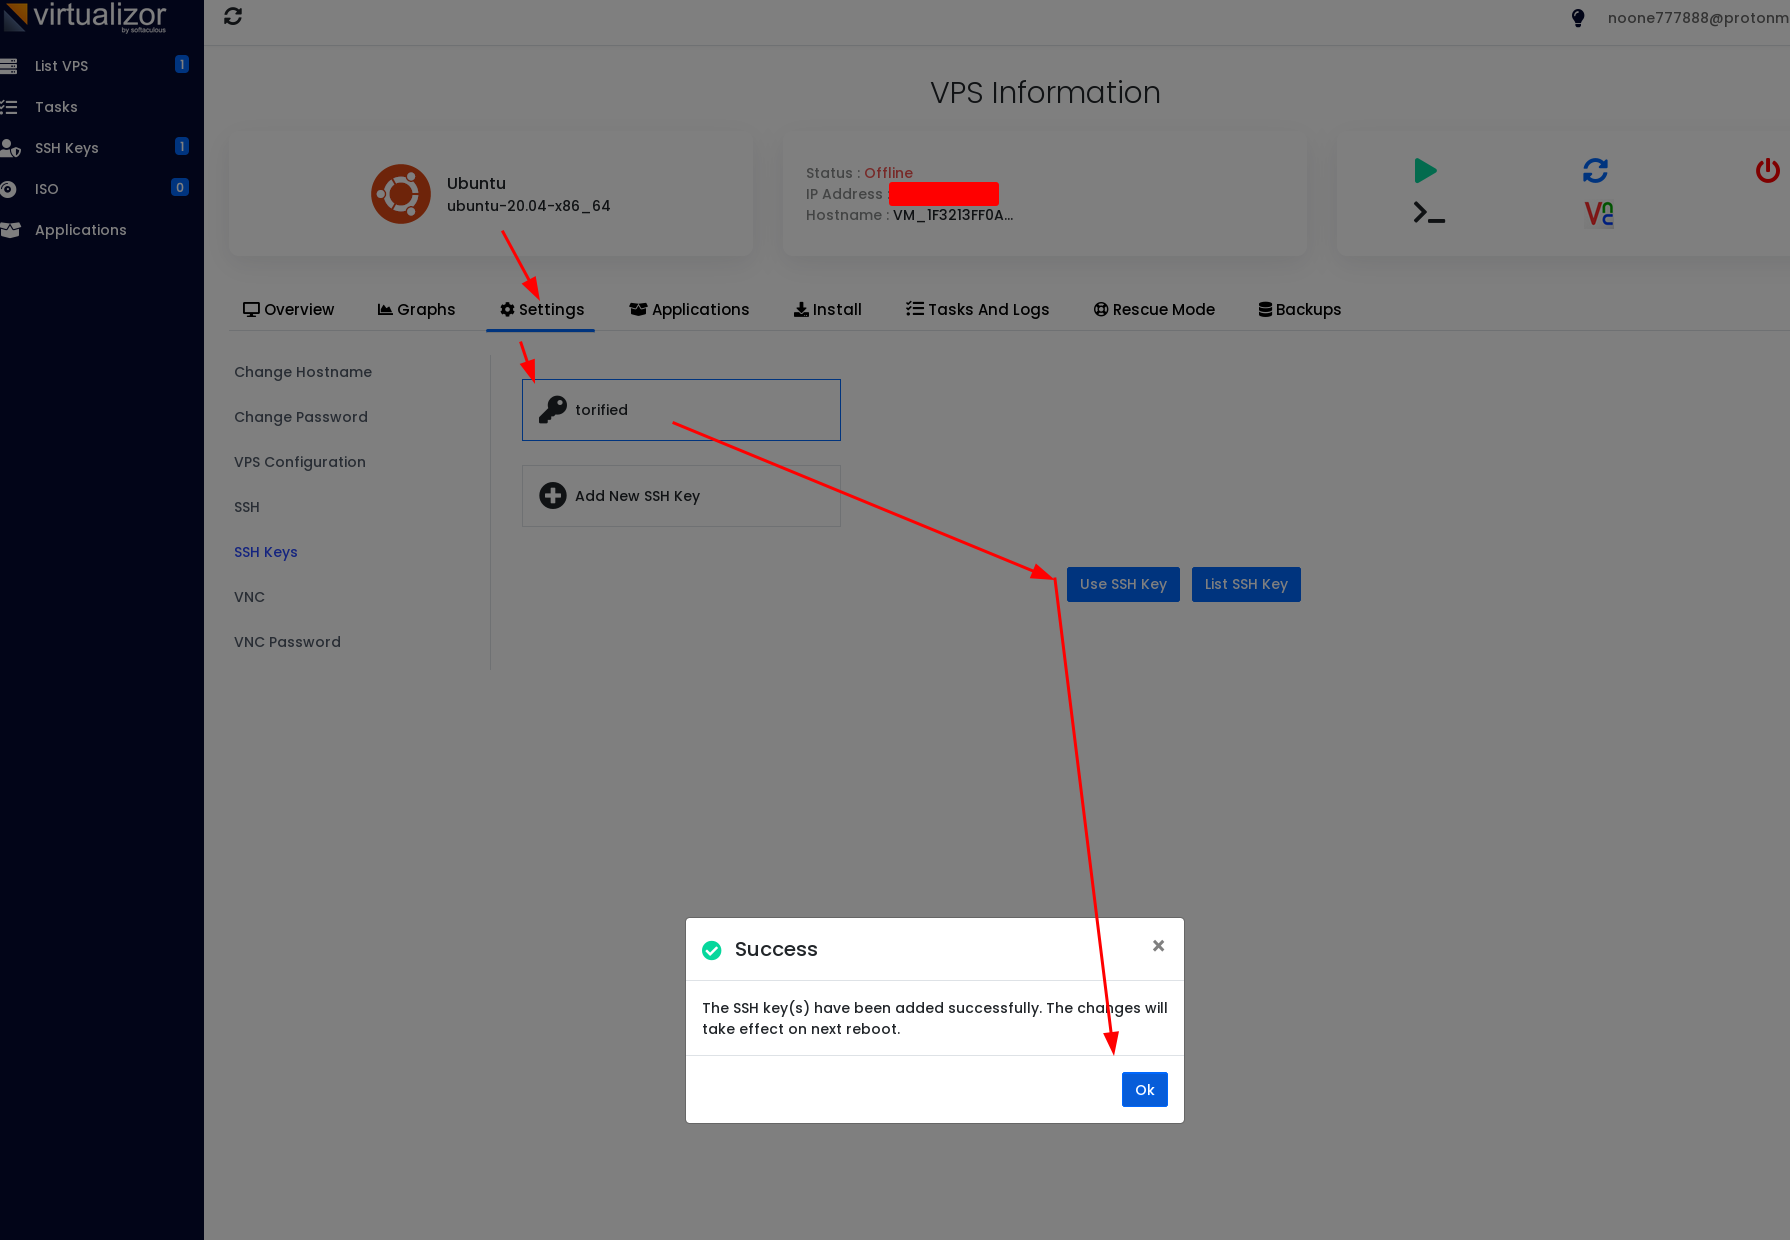
Then we can use that public SSH key to add on the dashboard:

[ 10.8.0.3/24 ] [ /dev/pts/42 ] [Github/blog/servers]
→ torify ssh torVPS
The authenticity of host 'x.x.x.x (x.x.x.x)' can't be established.
RSA key fingerprint is SHA256:UpDqKwtGBaFurplluD2Fo1tj66NYQOtLXXLLxGtm1Ac.
This key is not known by any other names
Are you sure you want to continue connecting (yes/no/[fingerprint])? yes
Warning: Permanently added 'x.x.x.x' (RSA) to the list of known hosts.
Enter passphrase for key '/home/nothing/.ssh/torified':
Welcome to Ubuntu 20.04 LTS (GNU/Linux 5.4.0-29-generic x86_64)

 * Documentation:  https://help.ubuntu.com
 * Management:     https://landscape.canonical.com
 * Support:        https://ubuntu.com/advantage

  System information as of Sun 08 May 2022 12:04:48 PM CEST

  System load:  0.53               Processes:             91
  Usage of /:   10.5% of 18.64GB   Users logged in:       0
  Memory usage: 12%                IPv4 address for eth0: x.x.x.x
  Swap usage:   0%

 * Ubuntu 20.04 LTS is out, raising the bar on performance, security,
   and optimisation for Intel, AMD, Nvidia, ARM64 and Z15 as well as
   AWS, Azure and Google Cloud.

     https://ubuntu.com/blog/ubuntu-20-04-lts-arrives


0 updates can be installed immediately.
0 of these updates are security updates.


The list of available updates is more than a week old.
To check for new updates run: sudo apt update

root@VM1F3213FF0A24DE83:~# w
 12:04:53 up 1 min,  1 user,  load average: 0.53, 0.26, 0.10
USER     TTY      FROM             LOGIN@   IDLE   JCPU   PCPU WHAT
root     pts/0    81.17.18.59      12:04    4.00s  0.01s  0.00s w
And there you go! We managed to connect via SSH via TOR (the ip 81...59 is a TOR exit node) to the VPS. Now let's setup our OpenVPN tcp/443 server like we did on this tutorial:
root@VM1F3213FF0A24DE83:~# wget https://raw.githubusercontent.com/ech1/serverside/master/ovpn/openvpn-install.sh
--2022-05-08 12:07:15--  https://raw.githubusercontent.com/ech1/serverside/master/ovpn/openvpn-install.sh
Resolving raw.githubusercontent.com (raw.githubusercontent.com)... 185.199.111.133, 185.199.108.133, 185.199.109.133, ...
Connecting to raw.githubusercontent.com (raw.githubusercontent.com)|185.199.111.133|:443... connected.
HTTP request sent, awaiting response... 200 OK
Length: 40045 (39K) [text/plain]
Saving to: ‘openvpn-install.sh’

openvpn-install.sh                           100%[===========================================================================================>]  39.11K  --.-KB/s    in 0.001s

2022-05-08 12:07:15 (42.7 MB/s) - ‘openvpn-install.sh’ saved [40045/40045]

root@VM1F3213FF0A24DE83:~# chmod +x openvpn-install.sh
root@VM1F3213FF0A24DE83:~# ./openvpn-install.sh
Welcome to the OpenVPN installer!
The git repository is available at: https://github.com/angristan/openvpn-install

I need to ask you a few questions before starting the setup.
You can leave the default options and just press enter if you are ok with them.

I need to know the IPv4 address of the network interface you want OpenVPN listening to.
Unless your server is behind NAT, it should be your public IPv4 address.
IP address: x.x.x.x

Checking for IPv6 connectivity...

Your host does not appear to have IPv6 connectivity.

Do you want to enable IPv6 support (NAT)? [y/n]: n

What port do you want OpenVPN to listen to?
   1) Default: 1194
   2) Custom
   3) Random [49152-65535]
Port choice [1-3]: 2
Custom port [1-65535]: 443

What protocol do you want OpenVPN to use?
UDP is faster. Unless it is not available, you shouldn't use TCP.
   1) UDP
   2) TCP
Protocol [1-2]: 2

What DNS resolvers do you want to use with the VPN?
   1) Current system resolvers (from /etc/resolv.conf)
   2) Self-hosted DNS Resolver (Unbound)
   3) Cloudflare (Anycast: worldwide)
   4) Quad9 (Anycast: worldwide)
   5) Quad9 uncensored (Anycast: worldwide)
   6) FDN (France)
   7) DNS.WATCH (Germany)
   8) OpenDNS (Anycast: worldwide)
   9) Google (Anycast: worldwide)
   10) Yandex Basic (Russia)
   11) AdGuard DNS (Anycast: worldwide)
   12) NextDNS (Anycast: worldwide)
   13) Custom
DNS [1-12]: 11

Do you want to use compression? It is not recommended since the VORACLE attack make use of it.
Enable compression? [y/n]: n

Do you want to customize encryption settings?
Unless you know what you're doing, you should stick with the default parameters provided by the script.
Note that whatever you choose, all the choices presented in the script are safe. (Unlike OpenVPN's defaults)
See https://github.com/angristan/openvpn-install#security-and-encryption to learn more.

Customize encryption settings? [y/n]: n

Okay, that was all I needed. We are ready to setup your OpenVPN server now.
You will be able to generate a client at the end of the installation.
Press any key to continue...
Then we create the an ovpn user:
Tell me a name for the client.
Use one word only, no special characters.
Client name: noone

Do you want to protect the configuration file with a password?
(e.g. encrypt the private key with a password)
   1) Add a passwordless client
   2) Use a password for the client
Select an option [1-2]: 2
⚠️ You will be asked for the client password below ⚠️

Note: using Easy-RSA configuration from: /etc/openvpn/easy-rsa/vars
Using SSL: openssl OpenSSL 1.1.1f  31 Mar 2020
Generating an EC private key
writing new private key to '/etc/openvpn/easy-rsa/pki/easy-rsa-8284.jYDpoc/tmp.oLwyqg'
Enter PEM pass phrase:
Verifying - Enter PEM pass phrase:
-----
Using configuration from /etc/openvpn/easy-rsa/pki/easy-rsa-8284.jYDpoc/tmp.wL7bls
Check that the request matches the signature
Signature ok
The Subject's Distinguished Name is as follows
commonName            :ASN.1 12:'noone'
Certificate is to be certified until Aug 10 10:10:31 2024 GMT (825 days)

Write out database with 1 new entries
Data Base Updated

Client noone added.

The configuration file has been written to /root/noone.ovpn.
Download the .ovpn file and import it in your OpenVPN client.
root@VM1F3213FF0A24DE83:~# cat noone.ovpn
client
proto tcp-client
remote x.x.x.x 443
dev tun
resolv-retry infinite
nobind
persist-key
persist-tun
remote-cert-tls server
verify-x509-name server_iBvk2Oez3oCaOewm name
auth SHA256
auth-nocache
cipher AES-128-GCM
tls-client
tls-version-min 1.2
tls-cipher TLS-ECDHE-ECDSA-WITH-AES-128-GCM-SHA256
ignore-unknown-option block-outside-dns
setenv opt block-outside-dns # Prevent Windows 10 DNS leak
verb 3

[...]
IF YOU'RE ON ARCH LINUX DONT FORGET TO DO THIS (as instructed here):
sudo  chown -R openvpn.network /var/log/openvpn /etc/openvpn/

systemctl restart openvpn-server@server.service
Then we create the user 'noone' and then retrieve the noone.ovpn file
Then we add the following socks-proxy settings, along with the routing gateway openvpn setting to use our tor bridge node:
[ 10.8.0.3/24 ] [ /dev/pts/55 ] [~]
→ vim noone.ovpn

[ 10.0.0.10/16 ] [ /dev/pts/52 ] [~]
→ cat noone.ovpn
client
proto tcp-client
remote x.x.x.x 443
dev tun
resolv-retry infinite
nobind
persist-key
persist-tun
remote-cert-tls server
verify-x509-name server_iBvk2Oez3oCaOewm name
auth SHA256
auth-nocache
cipher AES-128-GCM
tls-client
tls-version-min 1.2
tls-cipher TLS-ECDHE-ECDSA-WITH-AES-128-GCM-SHA256
ignore-unknown-option block-outside-dns
setenv opt block-outside-dns # Prevent Windows 10 DNS leak
verb 3

### TOR SETTINGS ###
socks-proxy 127.0.0.1 9050
####################


[...]
And from there we launch our openvpn client:
[ 10.8.0.3/24 ] [ /dev/pts/55 ] [~]
→ sudo openvpn noone.ovpn
2022-05-08 12:21:32 Unrecognized option or missing or extra parameter(s) in noone.ovpn:18: block-outside-dns (2.5.6)
2022-05-08 12:21:32 DEPRECATED OPTION: http-proxy-retry and socks-proxy-retry: In OpenVPN 2.4 proxy connection retries are handled like regular connections. Use connect-retry-max 1 to get a similar behavior as before.
2022-05-08 12:21:32 OpenVPN 2.5.6 [git:makepkg/e8df2e64d6f817e6+] x86_64-pc-linux-gnu [SSL (OpenSSL)] [LZO] [LZ4] [EPOLL] [PKCS11] [MH/PKTINFO] [AEAD] built on Mar 16 2022
2022-05-08 12:21:32 library versions: OpenSSL 1.1.1o  3 May 2022, LZO 2.10
🔐 Enter Private Key Password: ********************************************************************************************************************************************************************************************************************************************************************************************************************************************************************************************************************************************************************************************************************************
2022-05-08 12:21:34 Outgoing Control Channel Encryption: Cipher 'AES-256-CTR' initialized with 256 bit key
2022-05-08 12:21:34 Outgoing Control Channel Encryption: Using 256 bit message hash 'SHA256' for HMAC authentication
2022-05-08 12:21:34 Incoming Control Channel Encryption: Cipher 'AES-256-CTR' initialized with 256 bit key
2022-05-08 12:21:34 Incoming Control Channel Encryption: Using 256 bit message hash 'SHA256' for HMAC authentication
2022-05-08 12:21:34 TCP/UDP: Preserving recently used remote address: [AF_INET]127.0.0.1:9050
2022-05-08 12:21:34 Socket Buffers: R=[131072->131072] S=[16384->16384]
2022-05-08 12:21:34 Attempting to establish TCP connection with [AF_INET]127.0.0.1:9050 [nonblock]
2022-05-08 12:21:34 TCP connection established with [AF_INET]127.0.0.1:9050
2022-05-08 12:21:34 TCP_CLIENT link local: (not bound)
2022-05-08 12:21:34 TCP_CLIENT link remote: [AF_INET]127.0.0.1:9050
2022-05-08 12:21:34 TLS: Initial packet from [AF_INET]127.0.0.1:9050, sid=26ee6e4f 194dec0f
2022-05-08 12:21:34 VERIFY OK: depth=1, CN=cn_7jughGI6Ccy2QiVF
2022-05-08 12:21:34 VERIFY KU OK
2022-05-08 12:21:34 Validating certificate extended key usage
2022-05-08 12:21:34 ++ Certificate has EKU (str) TLS Web Server Authentication, expects TLS Web Server Authentication
2022-05-08 12:21:34 VERIFY EKU OK
2022-05-08 12:21:34 VERIFY X509NAME OK: CN=server_iBvk2Oez3oCaOewm
2022-05-08 12:21:34 VERIFY OK: depth=0, CN=server_iBvk2Oez3oCaOewm
2022-05-08 12:21:35 Control Channel: TLSv1.3, cipher TLSv1.3 TLS_AES_256_GCM_SHA384, peer certificate: 256 bit EC, curve prime256v1, signature: ecdsa-with-SHA256
2022-05-08 12:21:35 [server_iBvk2Oez3oCaOewm] Peer Connection Initiated with [AF_INET]127.0.0.1:9050
2022-05-08 12:21:36 SENT CONTROL [server_iBvk2Oez3oCaOewm]: 'PUSH_REQUEST' (status=1)
2022-05-08 12:21:36 PUSH: Received control message: 'PUSH_REPLY,dhcp-option DNS 176.103.130.130,dhcp-option DNS 176.103.130.131,redirect-gateway def1 bypass-dhcp,route-gateway 10.8.0.1,topology subnet,ping 10,ping-restart 120,ifconfig 10.8.0.2 255.255.255.0,peer-id 0,cipher AES-128-GCM'
2022-05-08 12:21:36 OPTIONS IMPORT: timers and/or timeouts modified
2022-05-08 12:21:36 OPTIONS IMPORT: --ifconfig/up options modified
2022-05-08 12:21:36 OPTIONS IMPORT: route options modified
2022-05-08 12:21:36 OPTIONS IMPORT: route-related options modified
2022-05-08 12:21:36 OPTIONS IMPORT: --ip-win32 and/or --dhcp-option options modified
2022-05-08 12:21:36 OPTIONS IMPORT: peer-id set
2022-05-08 12:21:36 OPTIONS IMPORT: adjusting link_mtu to 1626
2022-05-08 12:21:36 OPTIONS IMPORT: data channel crypto options modified
2022-05-08 12:21:36 Outgoing Data Channel: Cipher 'AES-128-GCM' initialized with 128 bit key
2022-05-08 12:21:36 Incoming Data Channel: Cipher 'AES-128-GCM' initialized with 128 bit key
2022-05-08 12:21:36 net_route_v4_best_gw query: dst 0.0.0.0
2022-05-08 12:21:36 net_route_v4_best_gw result: via 10.0.0.1 dev enp5s0
2022-05-08 12:21:36 ROUTE_GATEWAY 10.0.0.1/255.255.0.0 IFACE=enp5s0 HWADDR=d8:bb:c1:04:b2:00
2022-05-08 12:21:36 TUN/TAP device tun0 opened
2022-05-08 12:21:36 net_iface_mtu_set: mtu 1500 for tun0
2022-05-08 12:21:36 net_iface_up: set tun0 up
2022-05-08 12:21:36 net_addr_v4_add: 10.8.0.2/24 dev tun0
2022-05-08 12:21:36 net_route_v4_add: 127.0.0.1/32 via 10.0.0.1 dev [NULL] table 0 metric -1
2022-05-08 12:21:36 net_route_v4_add: 0.0.0.0/1 via 10.8.0.1 dev [NULL] table 0 metric -1
2022-05-08 12:21:36 net_route_v4_add: 128.0.0.0/1 via 10.8.0.1 dev [NULL] table 0 metric -1
2022-05-08 12:21:36 net_route_v4_add: 10.0.0.195/32 via 10.0.0.1 dev enp5s0 table 0 metric -1
2022-05-08 12:21:36 Initialization Sequence Completed
And from there you see that we can reach the internet just fine:
[ 10.8.0.2/24 ] [ /dev/pts/62 ] [~]
→ ip a

39: tun0: <POINTOPOINT,MULTICAST,NOARP,UP,LOWER_UP> mtu 1500 qdisc fq_codel state UNKNOWN group default qlen 500
    link/none
    inet 10.8.0.2/24 scope global tun0
       valid_lft forever preferred_lft forever
    inet6 fe80::575c:ea3:3b64:3249/64 scope link stable-privacy
       valid_lft forever preferred_lft forever

[ 10.8.0.2/24 ] [ /dev/pts/62 ] [~]
→ ping 10.8.0.1
PING 10.8.0.1 (10.8.0.1) 56(84) bytes of data.
64 bytes from 10.8.0.1: icmp_seq=1 ttl=64 time=157 ms
64 bytes from 10.8.0.1: icmp_seq=2 ttl=64 time=257 ms
^C
--- 10.8.0.1 ping statistics ---
2 packets transmitted, 2 received, 0% packet loss, time 1001ms
rtt min/avg/max/mdev = 157.325/207.198/257.071/49.873 ms

[ 10.8.0.2/24 ] [ /dev/pts/62 ] [~]
→ ping 1.1.1.1
PING 1.1.1.1 (1.1.1.1) 56(84) bytes of data.
64 bytes from 1.1.1.1: icmp_seq=1 ttl=60 time=222 ms
64 bytes from 1.1.1.1: icmp_seq=2 ttl=60 time=193 ms
^C
--- 1.1.1.1 ping statistics ---
2 packets transmitted, 2 received, 0% packet loss, time 1001ms
rtt min/avg/max/mdev = 192.825/207.581/222.337/14.756 ms

[ 10.8.0.2/24 ] [ /dev/pts/62 ] [~]
→ curl ifconfig.me
x.x.x.x
And there you go! Now we can do anything through our VPN which goes through tor.