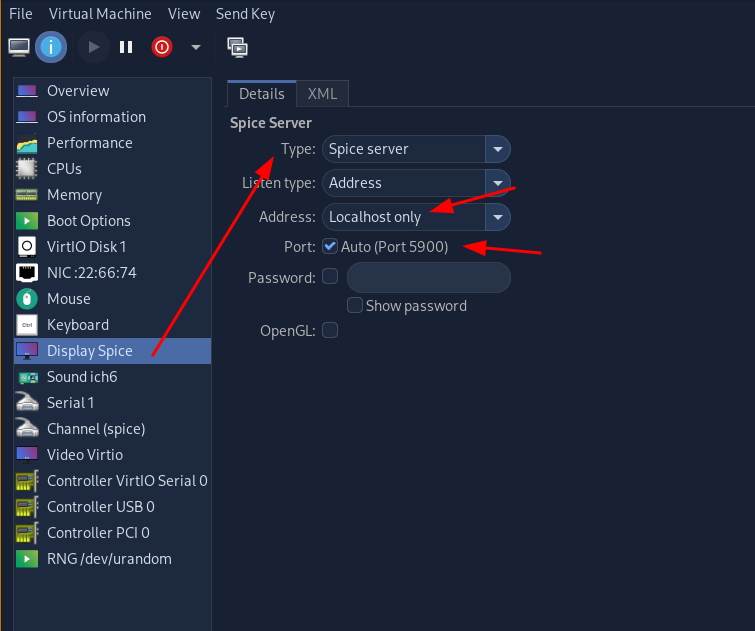
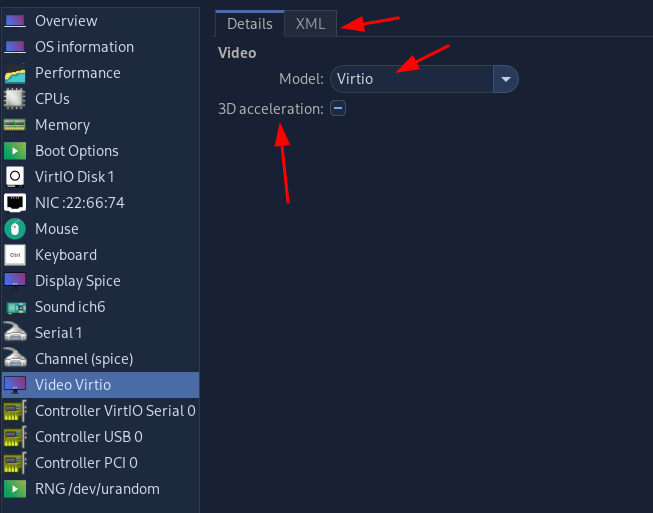
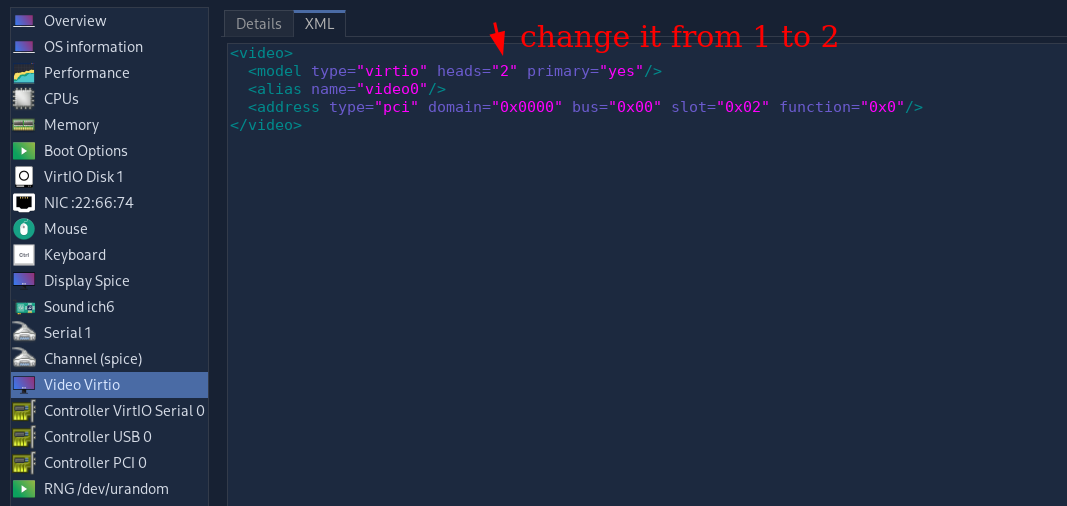
First configure the VM in virt-manager:
sudo pacman -S virt-viewer
Then connect to it via remote-viewer after launching it:
[ 10.0.2.2/24 ] [ nowhere ] [VAULT/ISOs/whonix]
→ remote-viewer spice://localhost:5900
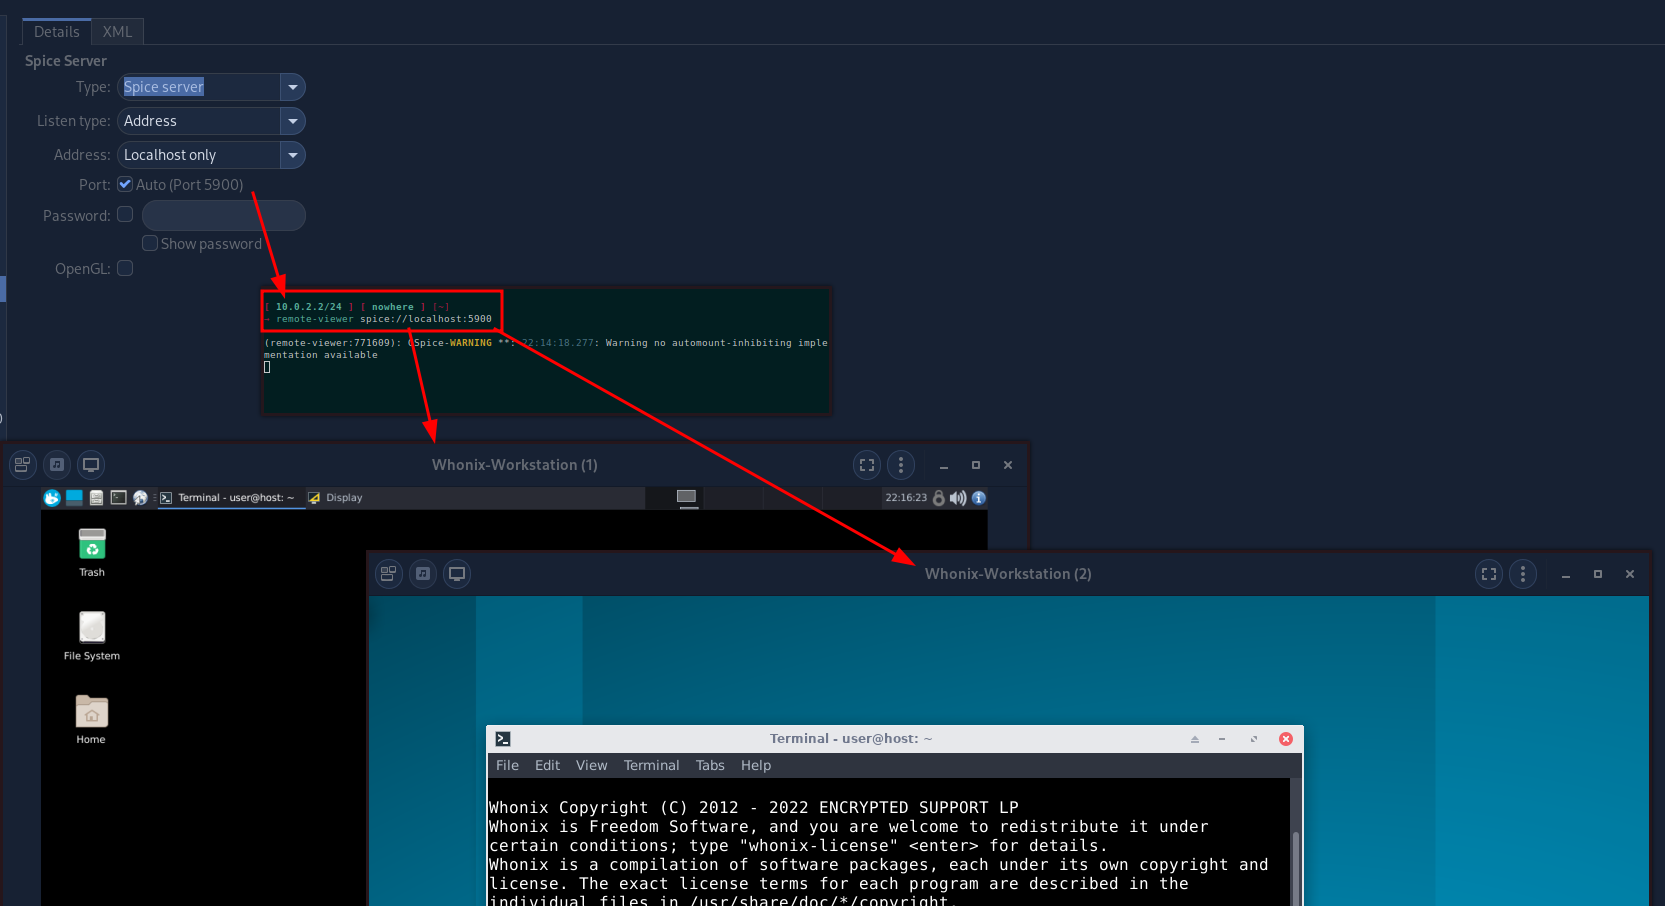
And that's it! You are now able to view KVMs via multiple screens. And that is otherwise impossible without specifically doing a gpu passthrough for just one VM.
As seen here, we can install spice-guest-tools-latest.exe on the win10 VM spice-guest-tools-latest.exe, after installing it on a win10 host, you will be able to copy and paste to and from the QEMU VM. (via virt-manager), however for linux VMs you can just install the spice-vdagent package:
if you want the virtio display drivers, follow the proxmox tutorial for it: here, you can download the latest virtio drivers here
sudo apt install spice-vdagent -y
sudo reboot now
With this setup for instance, you can copy to and from a qemu VM A and B, and to the host aswell.
If you experience any crackling sound on a debian VM (wether through the default virt-manager window or through a passthrough USB headset device do the following:
vim /etc/pulse/daemon.conf

[...]
default-sample-rate = 48000
[...]

:wq

kill -9 $(pidof pulseaudio)

pulseaudio
You can also install cockpit to manage your KVMs remotely:
apt install cockpit cockpit-machines -y
And make it easier to spin up vms anywhere in the system by not letting it use SELinux:
[ 192.168.0.50/24 ] [ /dev/pts/1 ] [lib/libvirt/images]
→ cat /etc/libvirt/qemu.conf | grep none | grep security_driver
# value of security_driver cannot contain "dac".  The value "none" is
security_driver = "none"

[ 192.168.0.50/24 ] [ /dev/pts/1 ] [/etc/cockpit]
→ cat cockpit.conf
[WebService]
Origins = https://pve2.nihilism.network wss://pve2.nihilism.network https://192.168.0.50:9090 https://pve2backend
ProtocolHeader = X-Forwarded-Proto

#with this it should be ready to be put behind a local reverse nginx proxy^

[ 192.168.0.50/24 ] [ /dev/pts/1 ] [lib/libvirt/images]
→ systemctl restart libvirtd
Then put it behind a reverse nginx proxy if you want, and dont forget to make it password protected with a basic auth
[ 10.8.0.2/24 ] [ home ] [/etc/nginx/sites-available]
→ cat pve2.nihilism.network
upstream pve2backend {
        server 192.168.0.50:9090;
}

server {
        listen 80;
        listen [::]:80;
        server_name pve2.nihilism.network;
        return 301 https://$server_name$request_uri;
}

server {
        listen 443 ssl http2;
        listen [::]:443 ssl http2;
        server_name pve2.nihilism.network;

        ssl_certificate /root/.acme.sh/pve2.nihilism.network/fullchain.cer;
        ssl_trusted_certificate /root/.acme.sh/pve2.nihilism.network/pve2.nihilism.network.cer;
        ssl_certificate_key /root/.acme.sh/pve2.nihilism.network/pve2.nihilism.network.key;

        ssl_protocols TLSv1.3 TLSv1.2;
        ssl_ciphers 'TLS13-CHACHA20-POLY1305-SHA256:TLS13-AES-256-GCM-SHA384:TLS13-AES-128-GCM-SHA256:ECDHE-ECDSA-CHACHA20-POLY1305:ECDHE-RSA-CHACHA20-POLY1305:ECDHE-ECDSA-AES256-GCM-SHA384:ECDHE-RSA-AES256-GCM-SHA384:ECDHE-ECDSA-AES128-GCM-SHA256:ECDHE-RSA-AES128-GCM-SHA256:ECDHE-ECDSA-AES256-SHA384:ECDHE-RSA-AES256-SHA384:ECDHE-ECDSA-AES128-SHA256:ECDHE-RSA-AES128-SHA256';
        ssl_prefer_server_ciphers on;
        ssl_session_cache shared:SSL:10m;
        ssl_session_timeout 10m;
        ssl_session_tickets off;
        ssl_ecdh_curve auto;
        ssl_stapling on;
        ssl_stapling_verify on;
        resolver 80.67.188.188 80.67.169.40 valid=300s;
        resolver_timeout 10s;

        add_header X-XSS-Protection "1; mode=block"; #Cross-site scripting
        add_header X-Frame-Options "SAMEORIGIN" always; #clickjacking
        add_header X-Content-Type-Options nosniff; #MIME-type sniffing
        add_header Strict-Transport-Security "max-age=31536000; includeSubDomains; preload";

        location / {
                #apt install apache2-utils -y
                #htpasswd -c /etc/nginx/auth/default.htpasswd nothing

                auth_basic "Password protection";
                auth_basic_user_file /etc/nginx/auth/default.htpasswd;

                proxy_pass https://pve2backend;
                proxy_http_version 1.1;
                proxy_set_header Upgrade $http_upgrade;
                proxy_set_header Connection "Upgrade";
        }
}
To resize a qcow2 disk do the following:
[ 192.168.0.50/24 ] [ /dev/pts/1 ] [/media/veracrypt1/VMs]
→ ls
debian_template.qcow2  home.qcow2  mc-1.16.5.qcow2

[ 192.168.0.50/24 ] [ /dev/pts/1 ] [/media/veracrypt1/VMs]
→ which qemu-img
/usr/bin/qemu-img

[ 192.168.0.50/24 ] [ /dev/pts/1 ] [/media/veracrypt1/VMs]
→ qemu-img resize mc-1.16.5.qcow2 +30G
Image resized.
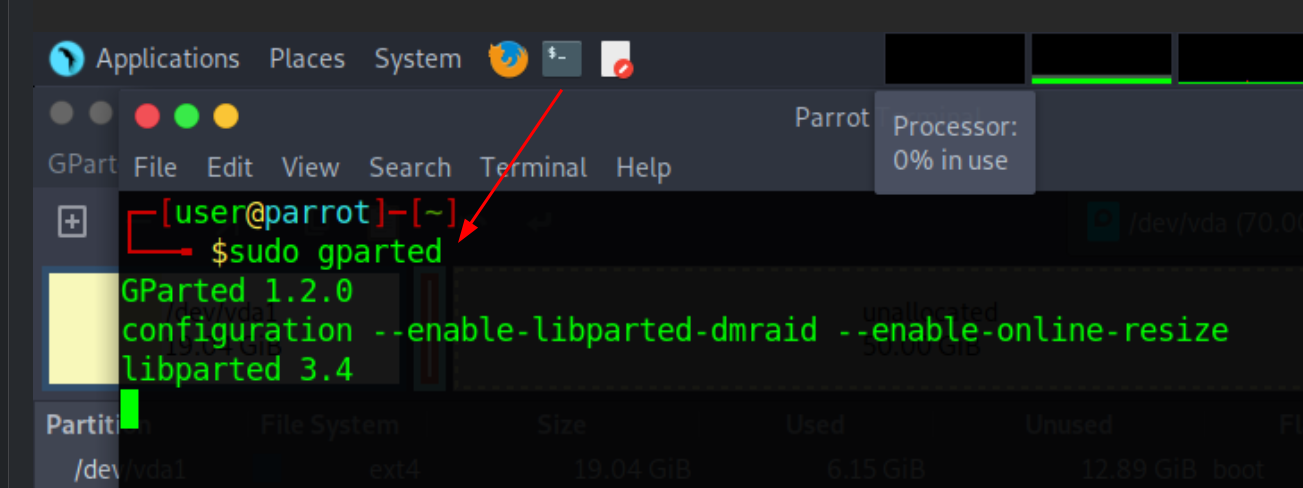
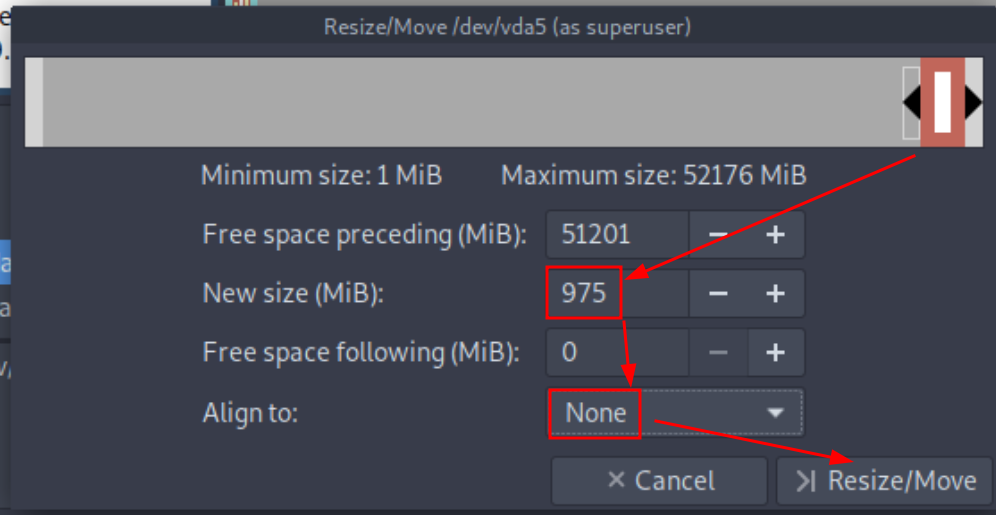
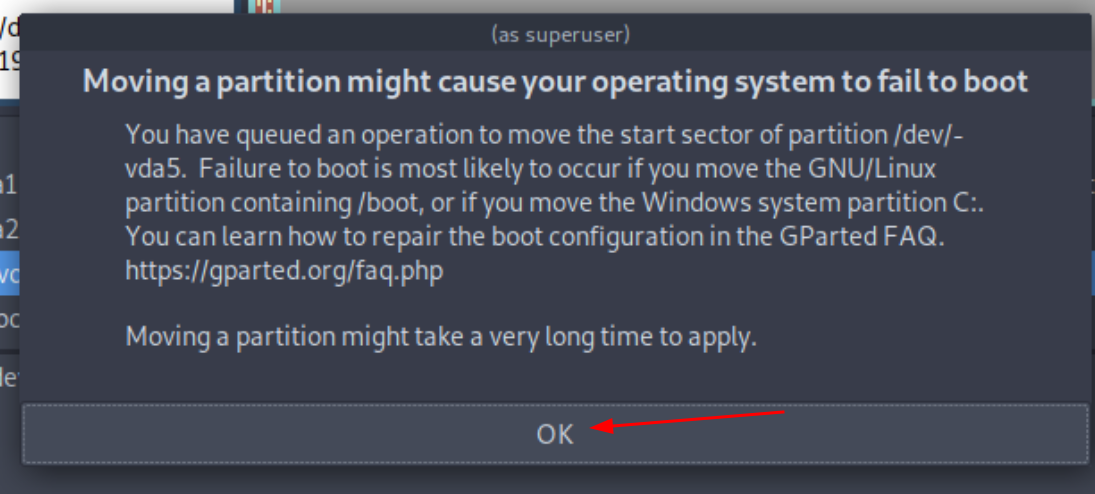
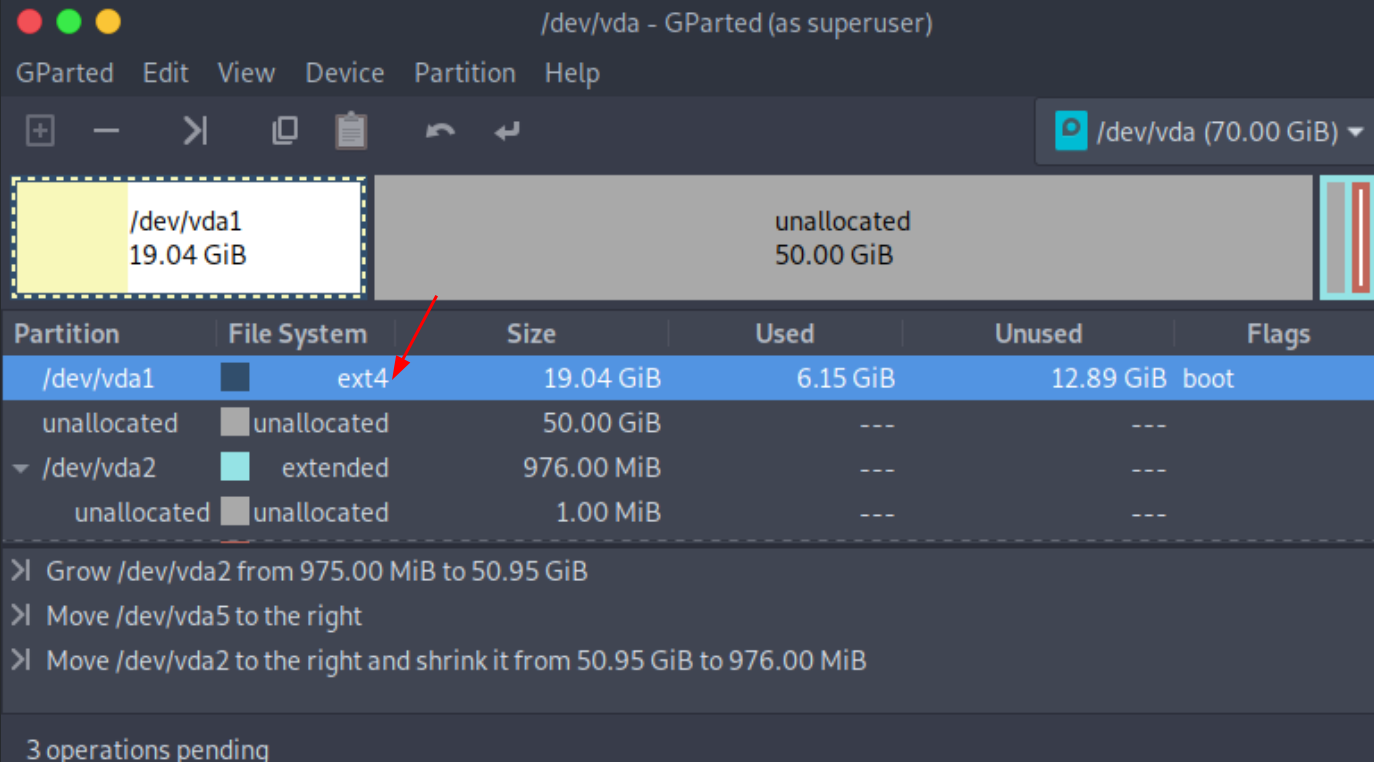
then to resize the root partition you need to boot into a live OS that you mount on the VM,
MAKE A SNAPSHOT OF THE VM TO BE SAFE
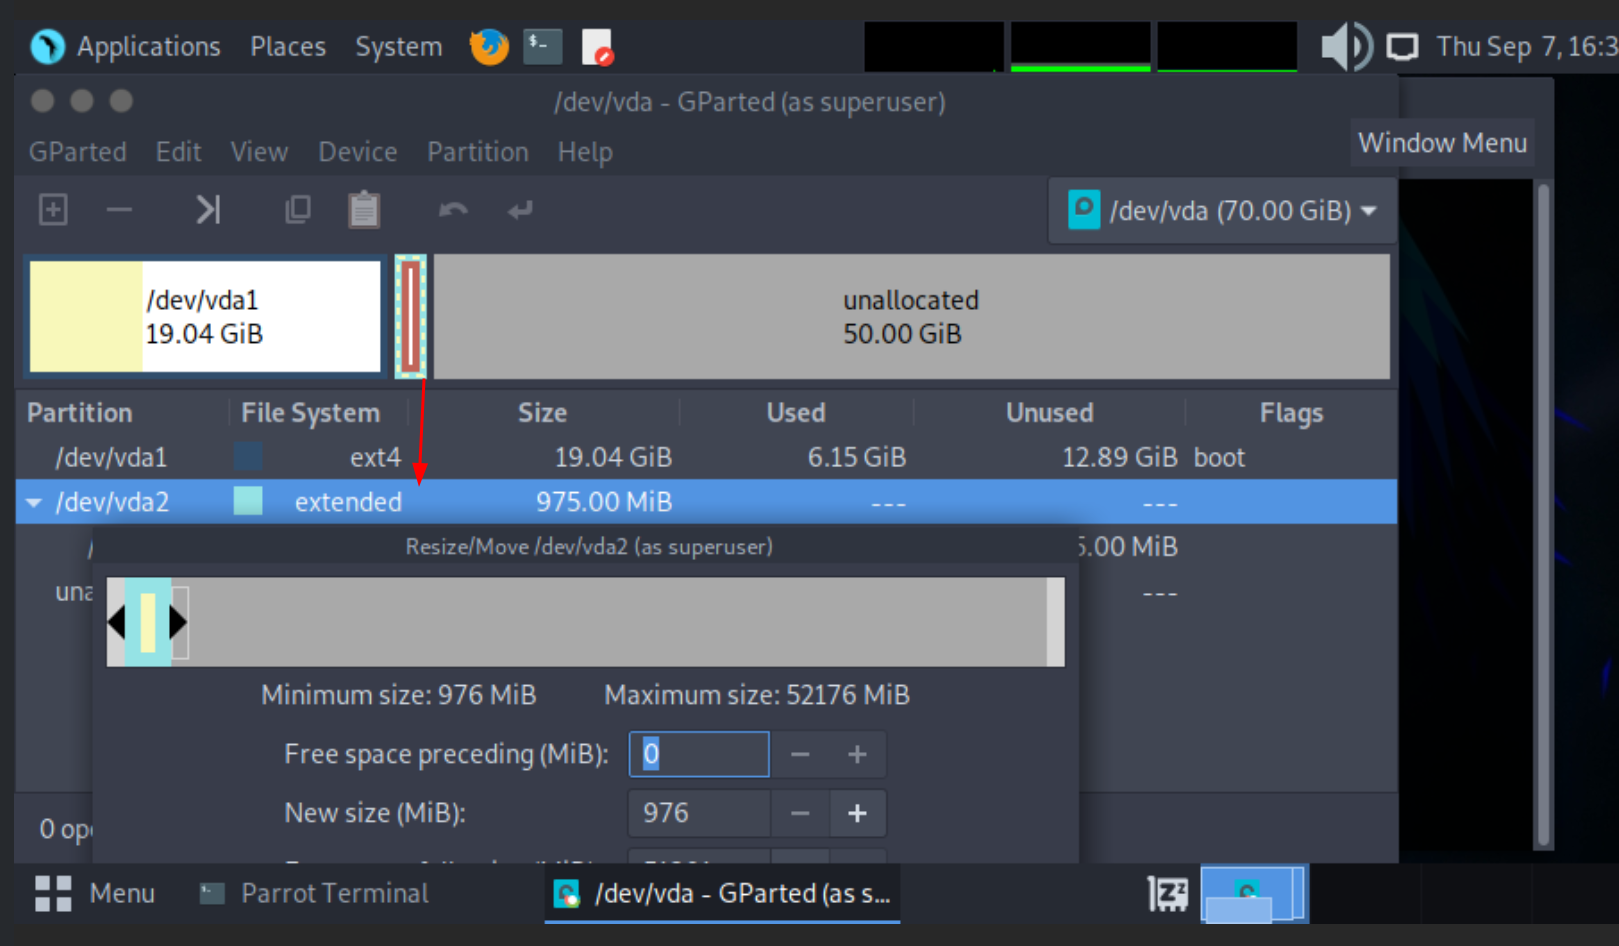
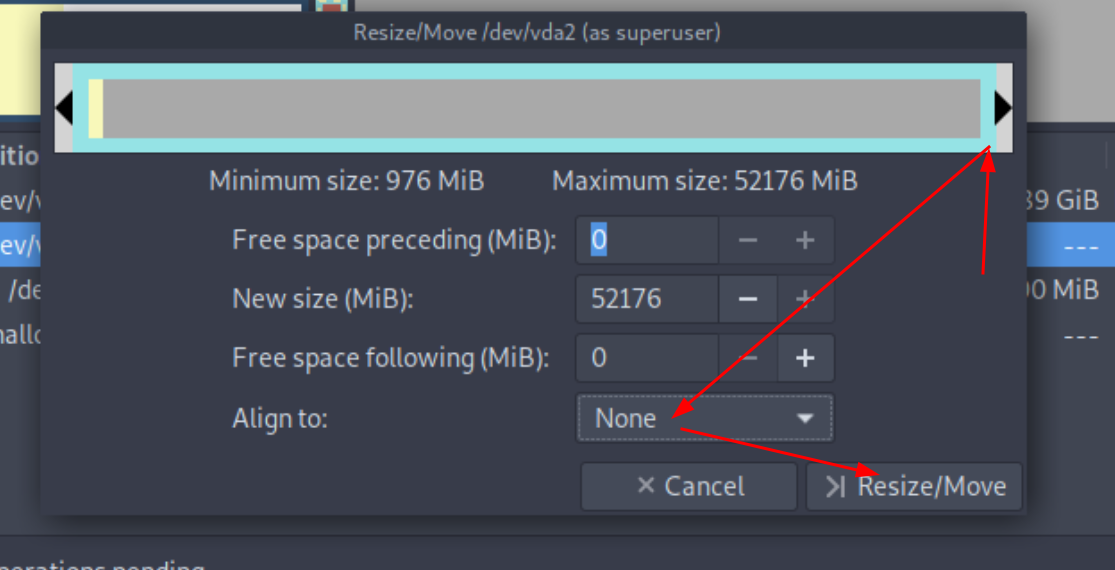
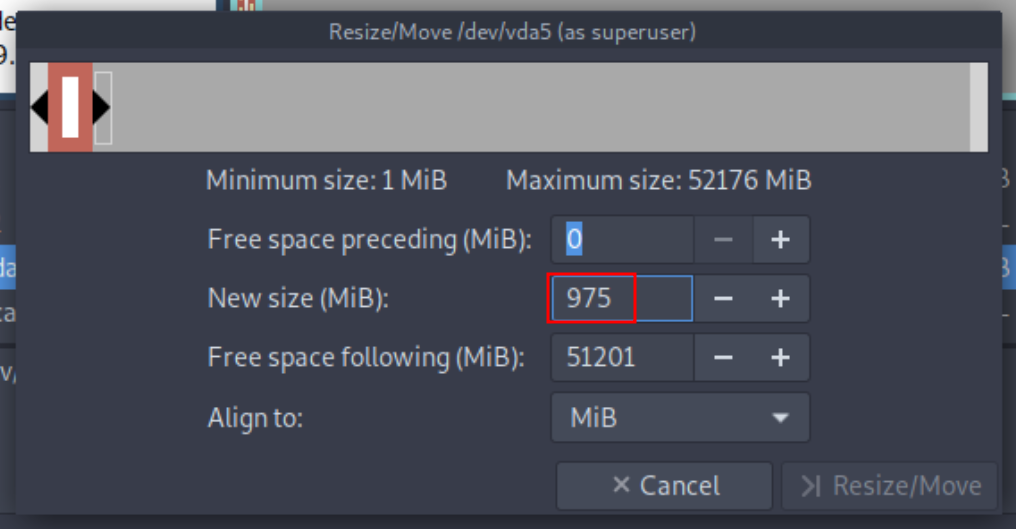
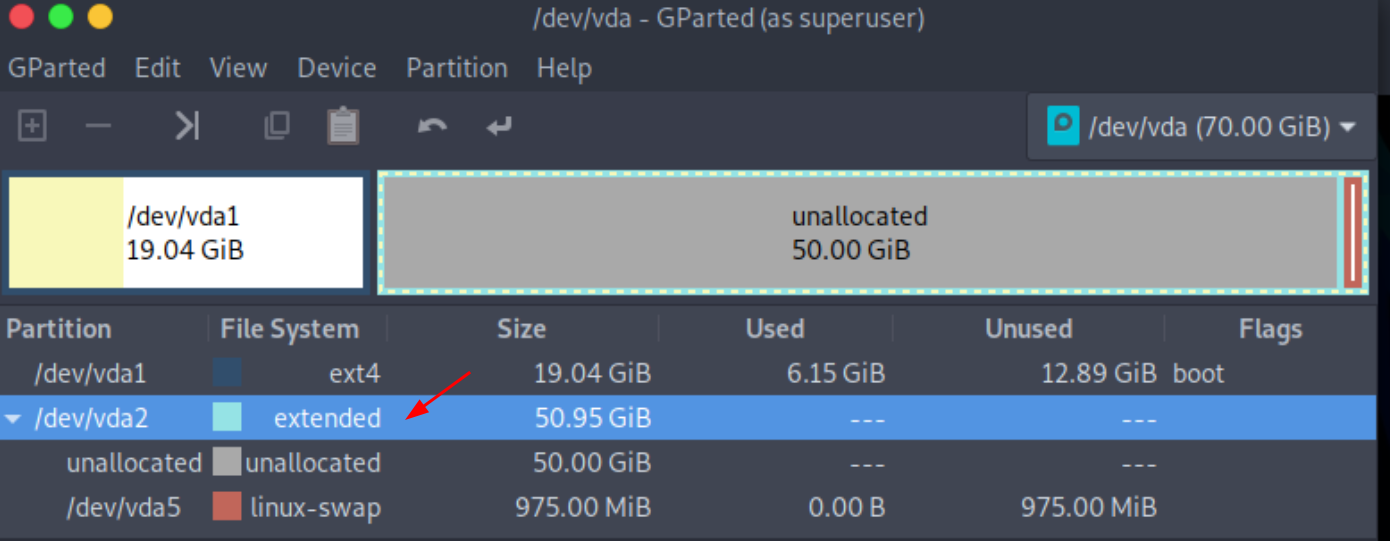
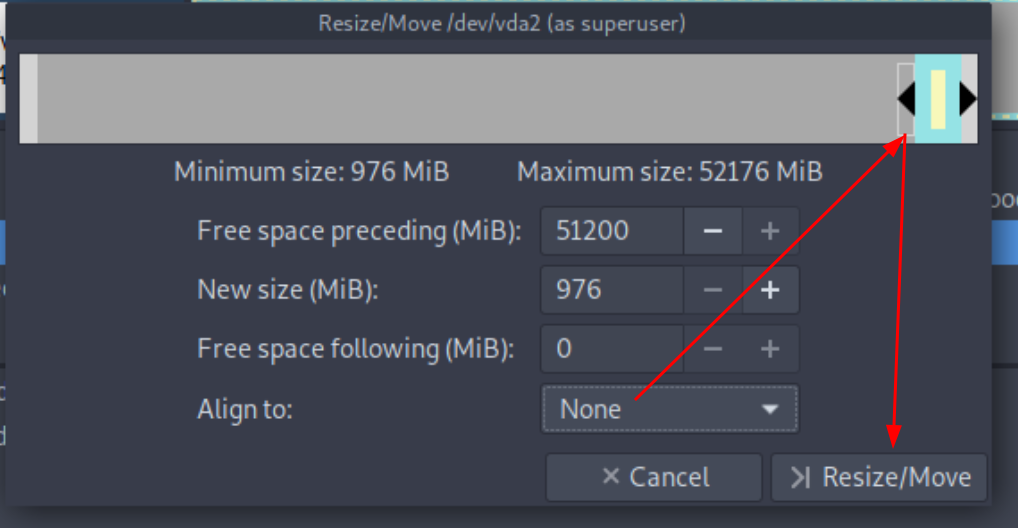
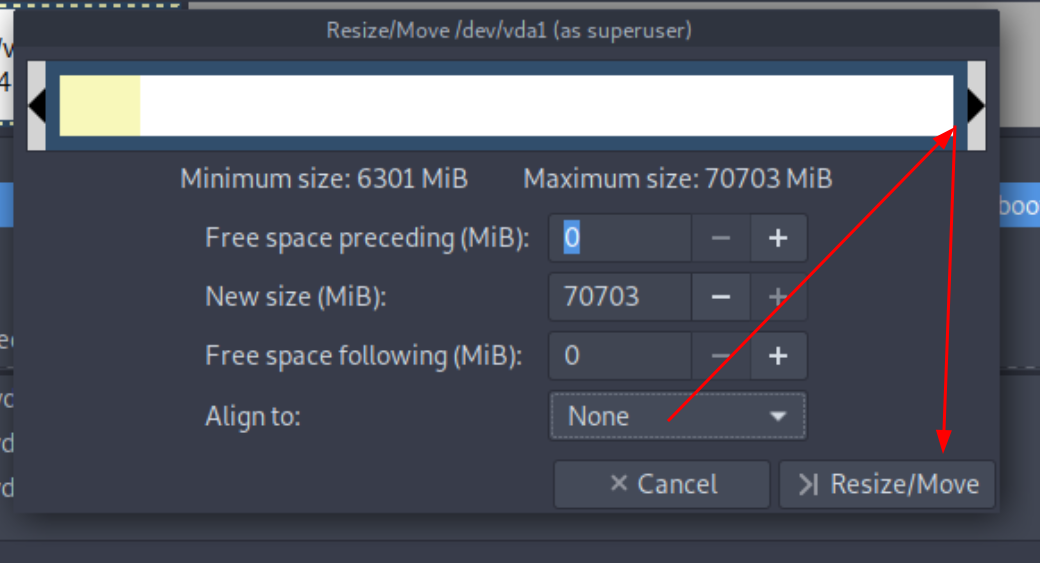
then use gparted from the live iso to resize the / partition to be +30G

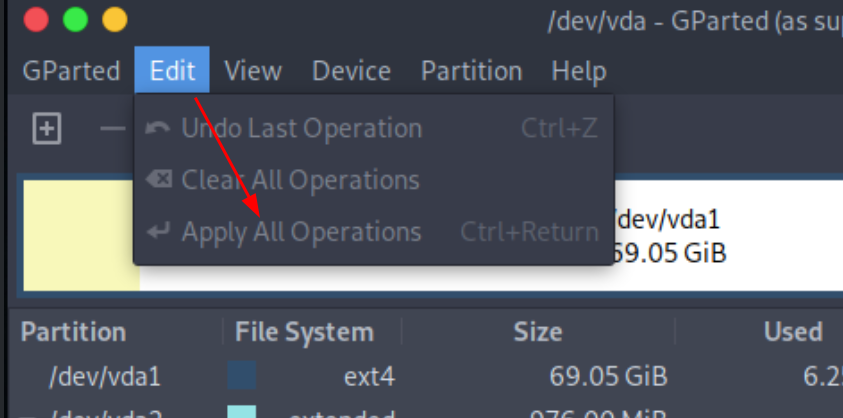
Then boot in the system again and see that the root partition has changed:
[ 10.0.2.2/24 ] [ /dev/pts/28 ] [~/Nextcloud/blog]
→ ssh mclocal2
Linux debian 6.1.0-11-amd64 #1 SMP PREEMPT_DYNAMIC Debian 6.1.38-4 (2023-08-08) x86_64

The programs included with the Debian GNU/Linux system are free software;
the exact distribution terms for each program are described in the
individual files in /usr/share/doc/*/copyright.

Debian GNU/Linux comes with ABSOLUTELY NO WARRANTY, to the extent
permitted by applicable law.
Last login: Thu Sep  7 18:45:05 2023 from 10.99.99.9
root@debian:~# dfc
FILESYSTEM (=) USED      FREE (-)  %USED AVAILABLE  TOTAL MOUNTED ON
udev       [--------------------]   0.0%      3.9G   3.9G /dev
tmpfs      [=-------------------]   0.1%    793.5M 794.1M /run
/dev/vda1  [===-----------------]  12.3%     59.4G  67.8G /
tmpfs      [--------------------]   0.0%      3.9G   3.9G /dev/shm
tmpfs      [--------------------]   0.0%      5.0M   5.0M /run/lock
tmpfs      [--------------------]   0.0%    794.1M 794.1M /run/user/0
To have the CPU host-passthrough configuration, you need the following:
in bios:
advanced > cpu configuration > Intel virtualisation technology / SMX enabled

enable IOMMU wherever it is

then once rebooted

go in your VM in virt-manager > preferences > edit XML
then VM > details > CPUs > XML > edit the first line to be "<domain type="kvm">"
Until there is Nothing left.
Donate XMR: 8AUYjhQeG3D5aodJDtqG499N5jXXM71gYKD8LgSsFB9BUV1o7muLv3DXHoydRTK4SZaaUBq4EAUqpZHLrX2VZLH71Jrd9k8
Contact: nihilist@nihilism.network (PGP)